The JHipster API Gateway
JHipster can generate API gateways. A gateway is a normal JHipster application, so you can use the usual JHipster options and development workflows on that project, but it also acts as the entrance to your microservices. More specifically, it provides HTTP routing and load balancing, quality of service, security and API documentation for all microservices.
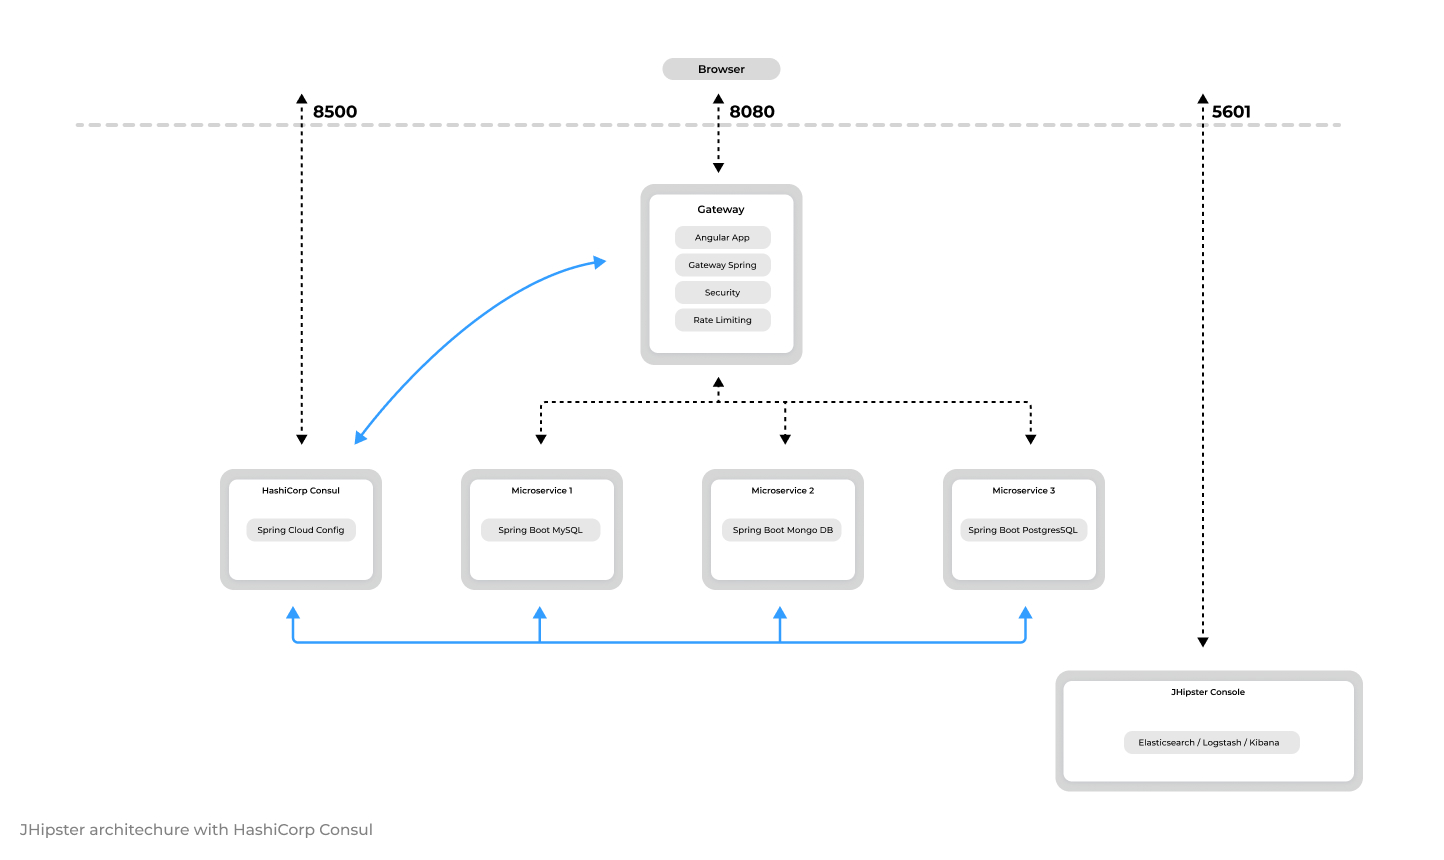
Architecture diagram
HTTP requests routing using the gateway
When the gateways and the microservices are launched, they will register themselves in the Consul service registry.
The gateway will automatically proxy all requests to the microservices, using their application name: for example, when microservices app1 is registered, it is available on the gateway on the /services/app1 URL.
For example, if your gateway is running on localhost:8080, you could point to http://localhost:8080/services/app1/api/foos to
get the foos resource served by microservice app1. If you're trying to do this with your Web browser, don't forget REST resources are secured by default in JHipster, so you need to send the correct JWT header (see the point on security below), or remove the security on those URLs in the microservice's SecurityConfiguration class.
If several instances of the same service are running, the gateway will get those instances from the Service Registry and load balance HTTP requests using Consul. You can access a detailed list of running microservices, including their IP addresses, Git version, status, and more, at http://localhost:8080/api/gateway/routes. This endpoint is secured for protection.
Each gateway has a specific "admin > gateway" menu, where opened HTTP routes and microservices instances can be monitored.
Security
Standard JHipster security options are detailed on this security documentation page. However, securing a microservice architecture has some specific tunings and options, which are detailed here.
JWT (JSON Web Token)
JWT (JSON Web Token) is an industry standard, easy-to-use method for securing applications in a microservices architecture.
JHipster uses the JJWT library, provided by Okta, for implementing JWT.
Tokens are generated by the gateway, and sent to the underlying microservices: as they share a common secret key, microservices are able to validate the token, and authenticate users using that token.
Those tokens are self-sufficient: they have both authentication and authorization information, so microservices do not need to query a database or an external system. This is important in order to ensure a scalable architecture.
For security to work, a JWT secret token must be shared between all applications.
- For each application the default token is unique, and generated by JHipster. It is stored in the
.yo-rc.jsonfile. - Tokens are configured with the
jhipster.security.authentication.jwt.secretkey in thesrc/main/resources/config/application.ymlfile. - To share this key between all your applications, copy the key from your gateway to all the microservices, or share it using JHipster's specific configuration of the Consul K/V store. This is one of the main reasons why people use those central configuration servers.
- A good practice is to have a different key in development and production.
OpenID Connect
JHipster provides OpenID Connect support, as detailed in our OpenID Connect documentation.
When selecting this option, you will use Keycloak by default, and you will probably want to run your complete microservice architecture using Docker Compose: be sure to read our Docker Compose documentation, and configure correctly your /etc/hosts for Keycloak.
When using OpenID Connect, the JHipster gateway will send OAuth2 tokens to microservices, which will accept those tokens as they are also connected to Keycloak.
Unlike JWT, those tokens are not self-sufficient, and should be stateful, which causes following issues:
- A performance issue in microservices: as it is very common to look for the current user's security information (otherwise we wouldn't be using any security option from the beginning), each microservice will call the OpenID Connect server to get that data. So in a normal setup, those calls will be made by each microservice, each time they get a request, and this will quickly cause a performance issue.
- If you have selected a caching option (here is the "Using a cache" documentation) when generating your JHipster microservice, a specific
CachedUserInfoTokenServicesSpring Bean will be generated, which will cache those calls. When properly tuned, this will remove the performance issue. - If you want more information on this "user info" request, it is configured using the standard Spring Boot configuration key
security.oauth2.resource.userInfoUriin yoursrc/main/resources/application.ymlconfiguration file.
- If you have selected a caching option (here is the "Using a cache" documentation) when generating your JHipster microservice, a specific
Automatic documentation
The gateway exposes the Swagger API definitions of the services it proxifies so you can benefit from all useful tools like Swagger UI and swagger-codegen.
The "admin > API" menu of a gateway has a specific drop-down list, showing the gateway's API and all the APIs from the registered microservices.
Using this drop-down list, all microservices APIs are automatically documented, and testable from the gateway.
When using a secured API, security tokens are automatically added to the Swagger UI interface, so all requests work out-of-the-box.
Rate limiting
This is an advanced feature that uses Bucket4j and Hazelcast to provide quality of service on microservices.
Gateways provide rate-limiting features, so the number of REST requests can be limited:
- by IP address (for anonymous users)
- by user login (for logged-in users)
JHipster will then use Bucket4j and Hazelcast to calculate request counts, and will send HTTP 429 (too many requests) errors when the limit is exceeded. The default limit per user is 100,000 API calls per hour.
This is an important feature, to protect a microservice architecture from being flooded by a specific user's requests.
As the gateway secures the REST endpoints, it has full access to the user's security information, so it can be extended to provide specific rate limits depending on the user's security roles.
To enable rate limiting, open up the application-dev.yml or application-prod.yml file and set enabled to true:
jhipster:
    gateway:
        rate-limiting:
            enabled: true
Data is stored in Hazelcast, so it is possible to scale gateways as long as the Hazelcast distributed cache is configured, which should work out-of-the-box:
- All gateways have Hazelcast configured by default
If you want to add more rules, or modify the existing rules, you need to code them in the RateLimitingFilter class. Examples of modifications could be:
- Lowering the limit of HTTP calls
- Adding limits per minute or per day
- Removing all limits for "admin" users
Access control policy
By default all registered microservices are available through the gateway. If you want to exclude a specific API from being exposed through the gateway, you can use the gateway's specific access control policy filter. It is configurable using the jhipster.gateway.authorized-microservices-endpoints key in the application-*.yml files:
jhipster:
    gateway:
        authorized-microservices-endpoints: # Access Control Policy, if left empty for a route, all endpoints will be accessible
            app1: /api,/v2/api-docs # recommended dev configuration
For example, if you only want the /api/foo endpoint of microservice bar to be available:
jhipster:
    gateway:
        authorized-microservices-endpoints:
            bar: /api/foo
Enabling TLS for Gateway Security
By default, the gateway operates over unsecured HTTP. For production environments, it's recommended to enable TLS for enhanced security. To do this, uncomment the provided code snippet, under application-prod.yml. This will utilize a self-signed TLS certificate located in config/tls with the filename keystore.p12, or you can specify your own keystore with a predefined password.
server:
    port: 443
    ssl:
      key-store: classpath:config/tls/keystore.p12
        key-store-password: password
        key-store-type: PKCS12
          key-alias: selfsigned
        # The ciphers suite enforce the security by deactivating some old and deprecated SSL cipher, this list was tested against SSL Labs (https://www.ssllabs.com/ssltest/)
        ciphers: TLS_ECDHE_RSA_WITH_AES_128_CBC_SHA,TLS_ECDHE_RSA_WITH_AES_256_CBC_SHA,TLS_ECDHE_RSA_WITH_AES_128_GCM_SHA256,TLS_ECDHE_RSA_WITH_AES_256_GCM_SHA384 ,TLS_DHE_RSA_WITH_AES_128_GCM_SHA256 ,TLS_DHE_RSA_WITH_AES_256_GCM_SHA384 ,TLS_ECDHE_RSA_WITH_AES_128_CBC_SHA256,TLS_ECDHE_RSA_WITH_AES_256_CBC_SHA384,TLS_DHE_RSA_WITH_AES_128_CBC_SHA256,TLS_DHE_RSA_WITH_AES_128_CBC_SHA,TLS_DHE_RSA_WITH_AES_256_CBC_SHA256,TLS_DHE_RSA_WITH_AES_256_CBC_SHA,TLS_RSA_WITH_AES_128_GCM_SHA256,TLS_RSA_WITH_AES_256_GCM_SHA384,TLS_RSA_WITH_AES_128_CBC_SHA256,TLS_RSA_WITH_AES_256_CBC_SHA256,TLS_RSA_WITH_AES_128_CBC_SHA,TLS_RSA_WITH_AES_256_CBC_SHA,TLS_DHE_RSA_WITH_CAMELLIA_256_CBC_SHA,TLS_RSA_WITH_CAMELLIA_256_CBC_SHA,TLS_DHE_RSA_WITH_CAMELLIA_128_CBC_SHA,TLS_RSA_WITH_CAMELLIA_128_CBC_SHA
Keep in mind that enabling TLS on the server might introduce some performance overhead. If possible, consider using a load balancer outside the gateway with SSL termination to handle encryption, which can help mitigate this performance impact.