Using JHipster in development
Please check our video tutorial on creating a new JHipster application!
General configuration
IDE configuration
If you haven't configured your IDE yet, please go to the Configuring your IDE page.
Application configuration
By default, JHipster uses the "development" profile, so you don't have to configure anything.
If you want more information on the available profiles, please go the section titled "Profiles".
If you want to configure some specific JHipster properties, have a look at the common application properties page.
Running the Java server
As a "main" Java class
From your IDE, right-click on the "Application" class at the root of your Java package hierarchy, and run it directly. You should also be able to debug it from your IDE.
The application will be available on http://localhost:8080.
This application will have "hot reload" enabled by default, so if you compile a class, the Spring application context should refresh itself automatically, without the need to restart the server.
As a Maven project
You can launch the Java server with Maven. JHipster provides a Maven wrapper, so you don't need to install Maven, and you have the guarantee that all project users have the same Maven version:
on Mac OS X/Linux:
./mvnw
on Windows:
mvnw
(this will run our default Maven task, spring-boot:run)
The application will be available on http://localhost:8080.
If you will use live reload with npm start then you can speed up server start up by excluding webpack tasks by:
./mvnw -P-webapp
Alternatively, if you have installed Maven, you can launch the Java server with Maven:
mvn
If you want more information on using Maven, please go to http://maven.apache.org
(Optional) As a Gradle project
If you selected the Gradle option, JHipster provides a Gradle wrapper, so you don't need to install Gradle, and you have the guarantee that all project users have the same Gradle version:
on Mac OS X/Linux:
./gradlew
on Windows:
gradlew
(this will run our default Gradle task, bootRun)
The application will be available on http://localhost:8080.
If you will use live reload with npm start then you can speed up server start up by excluding webpack tasks by:
./gradlew -x webapp
Alternatively, if you have installed Gradle, you can launch the Java server with Gradle:
gradle
If you want more information on using Gradle, please go to https://gradle.org
Working with Angular/React
Running Webpack
This step is required to see changes in your TypeScript code and have live reloading of your client-side code.
Running Webpack is the default task in the package.json file, so it is enough to run:
npm start
This provides very impressive features:
- As soon as you modify one of your HTML/CSS/TypeScript file, your browser will refresh itself automatically
- When you test your application on several different browsers or devices, all your clicks/scrolls/inputs should be automatically synchronized on all screens
This will launch:
- A Webpack task that will automatically compile TypeScript code into JavaScript
- A Webpack "hot module reload" server that will run on http://localhost:9060/ (and has a proxy to http://127.0.0.1:8080/api to access the Java back-end)
- A BrowserSync task that will run on http://localhost:9000/, which has a proxy to http://localhost:9060/ (the Webpack "hot module reload" server), and which will synchronize the user's clicks/scrolls/inputs
- The BrowserSync UI, which will be available on http://localhost:3001/
NOTE: BrowserSync by default enables ghostMode which can create some confusion
especially when using multiple browser tabs. To avoid
this you can always turn off ghostMode. Some commented code is provided in webpack.dev.js for easy disabling of ghostMode.
Running NPM
Direct project dependencies are configured into package.json, but transitive dependencies are defined into the package-lock.json file, that get generated when npm install is run.
It is advised to check package-lock.json into source control, so that all team members of a project have the same versions of all dependencies. Running npm install again will regenerate the package-lock.json with the latest versions of transitive dependencies.
Other NPM tasks
Some npm commands used as an example.
npm run lint: check for code style issues in the TypeScript codenpm run lint:fix: try to automatically correct TypeScript lint issuesnpm run tsc: compile the TypeScript codenpm run test: run unit tests with Jestnpm run test:watch: keep the Jest unit tests running, for live feedback when code is changednpm run e2e: run "end to end" tests with Protractor (only works if the Protractor option has been selected when the project was generated)
Using a database
Running a database
If you use a non-embedded database, like MySQL, MariaDB, PostgreSQL, MSSQL, MongoDB, Cassandra or Couchbase, you will need to install and configure that database.
The easiest and recommended way with JHipster is to use Docker Compose. Follow our Docker Compose guide here.
If you prefer to install and configure your database manually, you must create the schema and its user because Liquibase only creates the objects (tables, indexes, ...) in an existing schema. Then don't forget to configure your Spring Boot properties accordingly in your src/main/resources/config/application-*.yml files (for example your database URL, login and password).
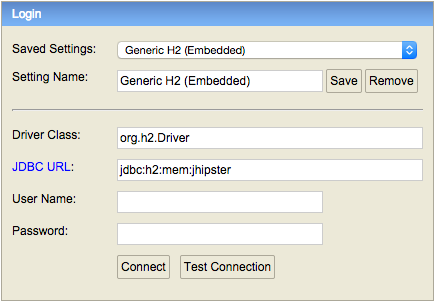
Using the H2 database in development
If you choose the H2 database, you will have an in-memory database running inside your application, and you can access its console at http://localhost:8080/h2-console by default.
To connect to the database, select the pre-configured options:
- Driver Class: org.h2.Driver
- JDBC URL: jdbc:h2:mem:jhipster
- User name: <blank>
- Password: <blank>
Using MySQL, MariaDB or PostgreSQL in development
This option is bit more complex than using H2, but you have a some important benefits:
- Your data is kept across application restarts
- Your application starts a little bit faster
- You can use the great
./mvnw liquibase:diffgoal (see below)
Note: for MySQL, you probably need to start your database with these options:
--lower_case_table_names=1: see the MySQL Schema Object Names documentation--skip-ssl: see the MySQL Server Options documentation--character_set_server=utf8: see the MySQL Server System Variables documentation--explicit_defaults_for_timestamp: see the MySQL Server System Variables documentation
The command is:
mysqld --lower_case_table_names=1 --skip-ssl --character_set_server=utf8 --explicit_defaults_for_timestamp
Database updates
If you add or modify a JPA entity, you will need to update your database schema.
JHipster uses Liquibase to manage the database updates, and stores its configuration in the /src/main/resources/config/liquibase/ directory.
There are 3 ways to work with Liquibase:
- use the entity sub-generator
- use the liquibase plugin
- update the configuration files manually
Database updates with the entity sub-generator
If you use the entity sub-generator, here is the development workflow:
- Run the entity sub-generator
- A new "change log" is created in your
src/main/resources/config/liquibase/changelogdirectory, and has been automatically added to yoursrc/main/resources/config/liquibase/master.xmlfile - Review this change log, it will be applied the next time you run your application
Database updates with the liquibase plugin
If you have chosen to use H2, MySQL, MariaDB or PostgreSQL in development, you can follow this section to automatically generate a changelog.
Note: If you are running H2 with in-memory persistence, you need to startup your application before running the liquibase commands.
Maven
Liquibase Hibernate is a Maven plugin that is configured in your pom.xml, and is independent from your Spring application.yml file, so if you have changed the default settings (for example, changed the database password), you need to modify both files.
Here is the development workflow:
- Modify your JPA entity (add a field, a relationship, etc.)
- Skip changes in the regenerated liquibase file for that entity
config/liquibase/changelog/DATE_added_entity_ENTITY_NAME.xmlto avoid conflict with the soon to be generated changelog file bellow - Compile your application (this works on the compiled Java code, so don't forget to compile!)
- Run
./mvnw liquibase:diff(or./mvnw compile liquibase:diffto compile before) - A new "change log" is created in your
src/main/resources/config/liquibase/changelogdirectory - Review this change log and add it to your
src/main/resources/config/liquibase/master.xmlfile, so it is applied the next time you run your application
Gradle
Liquibase gradle plugin is a Gradle plugin that is configured in your build.gradle, and is independent from your Spring application.yml file, so if you have changed the default settings (for example, changed the database password), you need to modify both files.
You can use the same workflow as for Maven except for the 4th step where you need to run ./gradlew liquibaseDiffChangelog -PrunList=diffLog.
Database updates by manually editing the change log
If you prefer (or need) to do a database update manually, here is the development workflow:
- Modify your JPA entity (add a field, a relationship, etc.)
- Create a new "change log" in your
src/main/resources/config/liquibase/changelogdirectory. The files in that directory are prefixed by their creation date (in yyyyMMddHHmmss format), and then have a title describing what they do. For example,20141006152300_added_price_to_product.xmlis a good name. - Add this "change log" file in your
src/main/resources/config/liquibase/master.xmlfile, so it is applied the next time you run your application
If you want more information on using Liquibase, please go to http://www.liquibase.org.
Internationalization
Internationalization (or i18n) is a first-class citizen in JHipster, as we believe it should be set up at the beginning of your project (and not as an afterthought).
Usage is as follows:
- With Angular, thanks to NG2 translate and a specific JHipster component, which uses JSON files for translation
- With React, thanks to a specific JHipster component, which works the same way as the Angular component, and uses the same files
For example, to add a translation to the "First Name" field, add a "translate" attribute with a key: <label jhiTranslate="settings.form.firstname">First Name</label>
This key references a JSON document, which will return the translated string. Angular/React will then replace the "First Name" string with the translated version.
If you want more information on using languages, read our Installing new languages documentation.