JHipster Registry
deprecated - Use Consul instead
Overview
The JHipster Registry is a runtime application, provided by the JHipster team. Like the JHipster generator, it is an Open Source, Apache 2-licensed application, and its source code is available on GitHub under the JHipster organization at jhipster/jhipster-registry.
The JHipster Registry has three main purposes:
- It is a Eureka server, that provides as a discovery server for applications. This server maintains and distributes a dynamic list of available application instances that are then used by the microservices to do HTTP requests routing and load balancing.
- It is a Spring Cloud Config server, that provide runtime configuration to all applications.
- It is an administration server, with dashboards to monitor and manage applications.
All those features are packaged into one convenient application with a modern Angular-based user interface.
Installation
Spring profiles
The JHipster Registry uses the usual JHipster dev and prod Spring profiles, as well as the standard composite from Spring Cloud Config (See official documentation).
As a result:
- Using the
devprofile will run the JHipster Registry with thedevand thecompositeprofiles. Thedevprofile will load the Spring Cloud configuration from the filesystem, looking for thecentral-configdirectory, which is relative to the running directory, defined insrc/main/resources/config/bootstrap.ymlfile. - Using the
prodprofile will run the JHipster Registry with theprodand thecompositeprofiles. Theprodprofile will load the Spring Cloud configuration from a Git repository, which is by default https://github.com/jhipster/jhipster-registry-sample-config. In a real-world usage, this repository should be changed, either by reconfiguring it in thesrc/main/resources/config/bootstrap-prod.ymlfile, or by reconfiguring thespring.cloud.config.server.compositeSpring property.
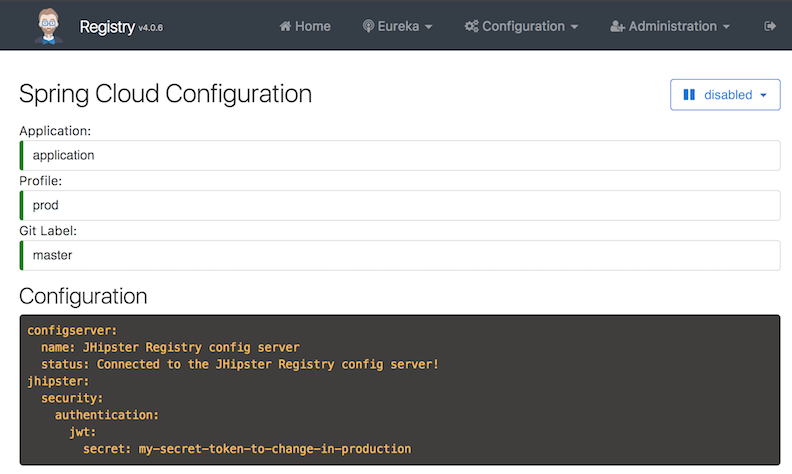
Once the JHipster Registry is running, you can check its configuration in the Configuration > Cloud Config menu. Please note that if you can't log in, it might be because the JWT signature key is not correctly set up, which is a sign that your configuration isn't good.
Using the pre-packaged JAR file
The JHipster Registry is available as an executable JAR file on our Releases page.
Download the JAR file, and run it as a usual JHipster application, using the profile you want to use (see the previous section about profiles). For example, to run it using a Spring Cloud Config configuration stored in the central-config directory:
java -jar jhipster-registry-<version>.jar --spring.security.user.password=admin --jhipster.security.authentication.jwt.secret=my-secret-key-which-should-be-changed-in-production-and-be-base64-encoded --spring.cloud.config.server.composite.0.type=native --spring.cloud.config.server.composite.0.search-locations=file:./central-config
Note that it is important to provide a JWT secret key to the registry on startup, either via the JHIPSTER_SECURITY_AUTHENTICATION_JWT_SECRET environment variable or with arguments as shown above. Another possible way is to set this value in the application.yml file of your centralized configuration source (which is loaded on startup by all your applications including the registry).
Please note that since JHipster 5.3.0 we have a new jhipster.security.authentication.jwt.base64-secret property, which is more secure, but as you might still use older releases
we use jhipster.security.authentication.jwt.secret in this documentation. More information on those properties is available in our security documentation.
Similarly, to run the registry with the prod profile, adapt the arguments to your setup, for example:
java -jar jhipster-registry-<version>.jar --spring.profiles.active=prod --spring.security.user.password=admin --jhipster.security.authentication.jwt.secret=my-secret-key-which-should-be-changed-in-production-and-be-base64-encoded --spring.cloud.config.server.composite.0.type=git --spring.cloud.config.server.composite.0.uri=https://github.com/jhipster/jhipster-registry-sample-config

java -jar jhipster-registry-<version>.jar --spring.profiles.active=prod --spring.security.user.password=admin --jhipster.security.authentication.jwt.secret=my-secret-key-which-should-be-changed-in-production-and-be-base64-encoded --spring.cloud.config.server.composite.0.type=git --spring.cloud.config.server.composite.0.uri=https://github.com/jhipster/jhipster-registry --spring.cloud.config.server.composite.0.search-paths=central-config
Building from source
The JHipster Registry can be cloned/forked/downloaded directly from jhipster/jhipster-registry. As the JHipster Registry is also a JHipster-generated application, you can run it like any other JHipster application:
- run it in development with
./mvnw(for the Java server) andnpm start(for managing the front-end), it will use by default thedevprofile and it will be available at http://127.0.0.1:8761/. - use
./mvnw -Pprod packageto package it in production, and generate the usual JHipster executable JAR file. You can then run the JAR file using thedevorprodSpring profile, for example:java -jar jhipster-registry-<version>.jar --spring.profiles.active=prod
Please note that to use the dev and composite profile, you need to have a central-config directory with your configuration, so if you run java -jar jhipster-registry-<version>.jar --spring.profiles.active=dev, you need to have that directory set up.
Using Docker
If you'd rather run the JHipster Registry from a Docker image, it is available on Docker Hub at jhipster/jhipster-registry. A docker-compose file to run this image is already present within each microservice src/main/docker directory:
- run
docker-compose -f src/main/docker/jhipster-registry.yml upto start the JHipster Registry. It will be available on port8761of your Docker host, so if it runs on your machine it should be at http://127.0.0.1:8761/.
Please read our Docker Compose documentation for more information on using the JHipster Registry with Docker Compose.
Running in the cloud
You can run a JHipster Registry instance in the cloud. This is mandatory in production, but this can also be useful in development (there is no need to run it on your laptop).
Please read the "microservices in production" documentation to learn how to deploy the JHipster Registry to Heroku.
Service discovery with Eureka

The JHipster Registry is a Netflix Eureka server, that provides service discovery for all applications.
- This is very useful for microservices architectures: this is how the gateways know which microservices are available, and which instances are up
- For all applications, including monoliths, this is how the Hazelcast distributed cache can automatically scale, see the Hazelcast cache documentation
Application configuration with Spring Cloud Config
The JHipster Registry is a Spring Config Server: when applications are launched they will first connect to the JHipster Registry to get their configuration. This is true for both gateways and microservices.
This configuration is a Spring Boot configuration, like the one found in the JHipster application-*.yml files, but it is stored in a central server, so it is easier to manage.
On startup, your gateways and microservices app will query the Registry's config server and overwrite their local properties with the ones defined there.
Two kinds of configurations sources are available (defined by the spring.cloud.config.server.composite property):
- A
nativeconfiguration, which is used by default in development (using the JHipsterdevprofile), and which uses the local filesystem. - A
Gitconfiguration, which is used by default in production (using the JHipsterprodprofile), and which stores the configuration in a Git server. This allows to tag, branch or rollback configurations using the usual Git tools, which are very powerful in this use-case.
To manage your centralized configuration you need to add appname-profile.yml files in your configuration source where appname and profile correspond to the application's name and current profile of the service that you want to configure.
For example, adding properties in a gateway-prod.yml file will set those properties only for the application named gateway started with a prod profile. Moreover, properties defined in application[-dev|prod].yml will be set for all your applications.
As the Gateway routes are configured using Spring Boot, they can also be managed using the Spring Config Server, for example you could map application app1-v1 to the /app1 URL in your v1 branch, and map application app1-v2 to the /app1 URL in your v2 branch. This is a good way of upgrading microservices without any downtime for end-users.
Using encrypted configuration values
The JHipster Registry has a specific configuration > encryption page to allow encryption and decryption of configuration values.
To encrypt configuration values (for example, database passwords) you need to:
- download the JCE and install it by following the instructions in the downloaded files (this is only required if you are using the Oracle JDK).
- set the
encrypt.keyproperty inbootstrap.yml(notapplication.yml) or use theENCRYPT_KEYenvironment variable with your symmetric key passphrase.
If everything is setup correctly, you should be able to use the specific Configuration > Encryption page, and also send POST requests to /config/encrypt and /config/decrypt endpoints with the text you want to manipulate in the body of the requests.
For example: curl localhost:8761/config/encrypt -d mypassword
The cipher text must be placed in any *.yml configuration file, in the form password= '{cipher}myciphertextafterencryotion' and it will be decrypted by the config server before sending it to its clients. This way your configuration files (stored in Git or stored "natively" on your filesystem) do not have plain text values.
For more information, please refer to Spring Cloud Config's Encryption and Decryption documentation.
Administration dashboards
The JHipster Registry provides administration dashboards, which are used for all application types. As soon as an application registers on the Eureka server, it will become available in the dashboards.
In order to access sensitive information from the applications, the JHipster Registry will use a JWT token (this is why the JHipster Registry only works for applications using JWT). The JWT key used to sign the request should be the same for the applications and the JHipster Registry: as by default the JHipster Registry configures applications through Spring Cloud Config, this should work out-of-the-box, as it will send the same key to all applications.
The metrics dashboard
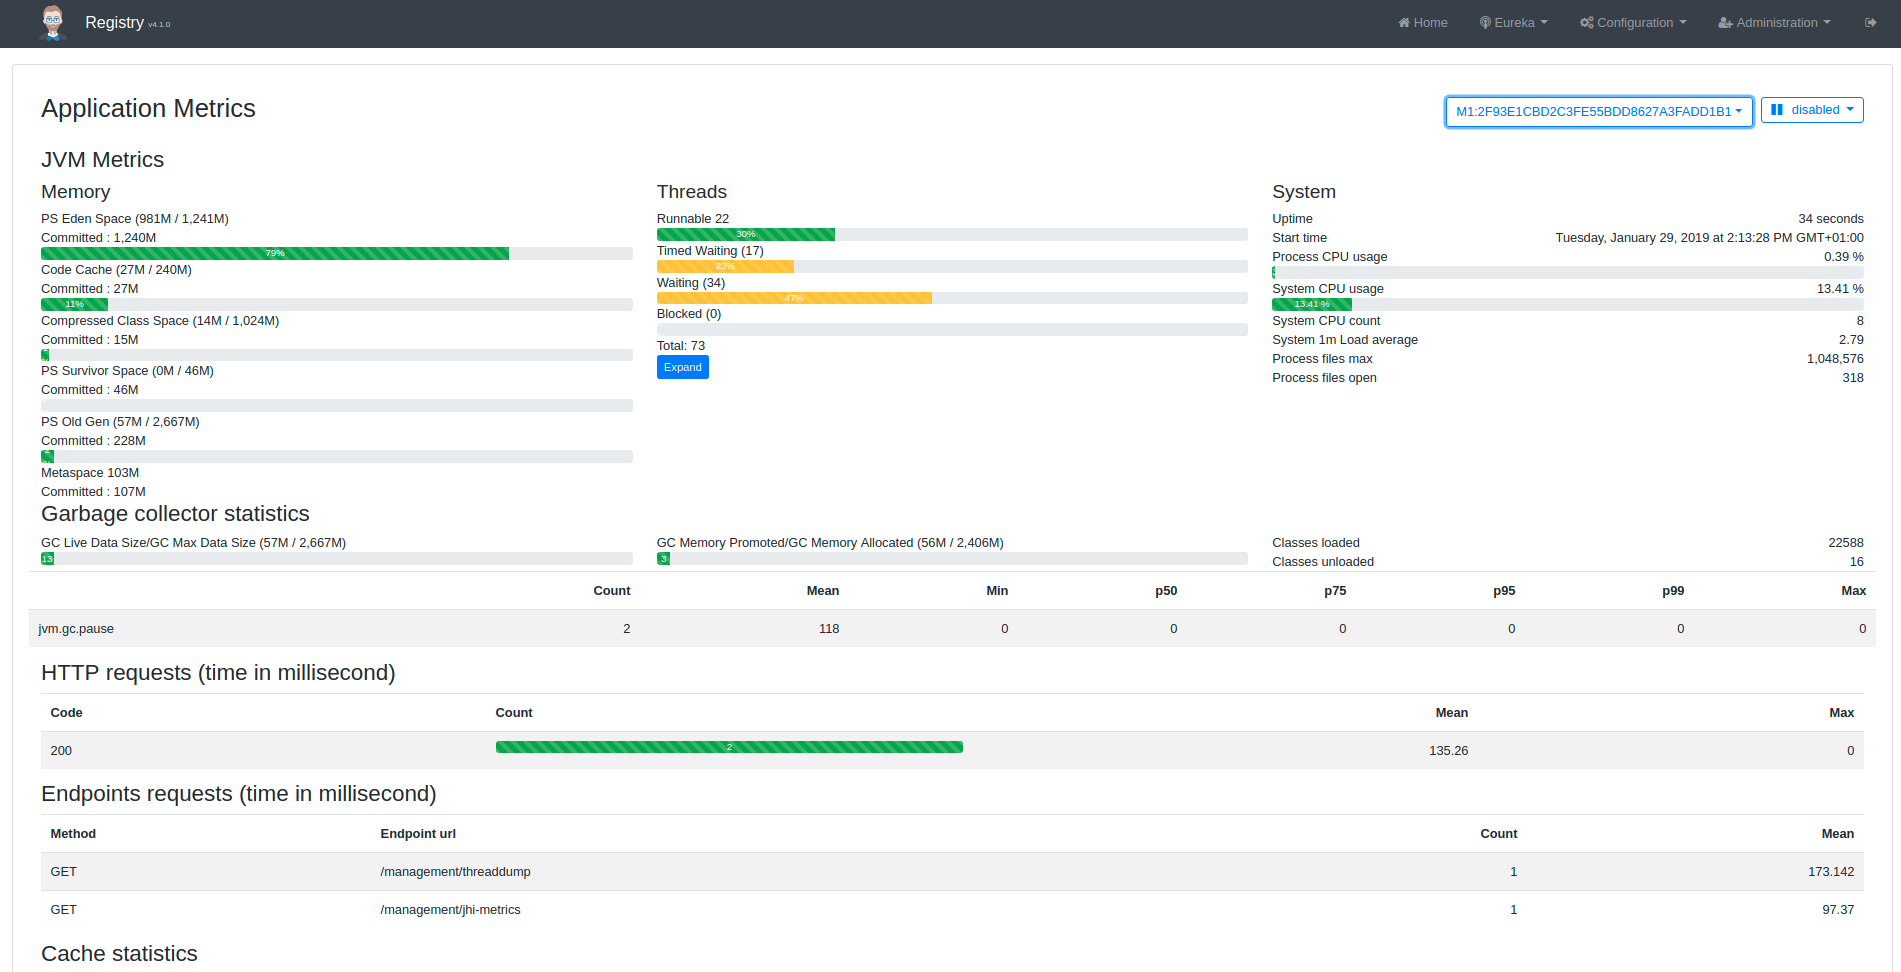
The metrics dashboard uses Micrometer to give a detailed view of the application performance.
It gives metrics on:
- the JVM
- HTTP requests
- cache usage
- database connection pool
By clicking on the Expand button next to the JVM thread metrics, you will get a stacktrace of the running application, which is very useful to find out blocked threads.
Note: As we switched the JHipster Registry to monitor metrics coming from Micrometer instead of Dropwizard metrics, it implies that all JHipster application generated with version 5.7.2 or older should be migrated to Micrometer to be monitored with the JHipster Registry. If you don't want to migrate your applications, please use JHipster Registry v4.0.6 or older.
To migrate your applications, you can use the JHipster upgrade sub-generator.
The health dashboard
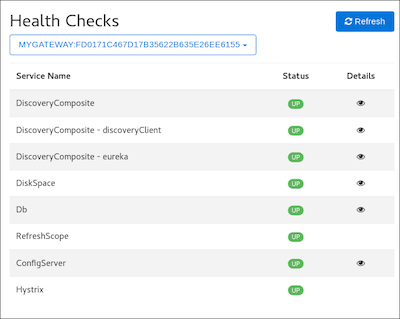
The health dashboard uses Spring Boot Actuator's health endpoint to give health information on various parts of the application. Many health checks are provided out-of-the-box by Spring Boot Actuator, and you can add application-specific health checks.
The configuration dashboard
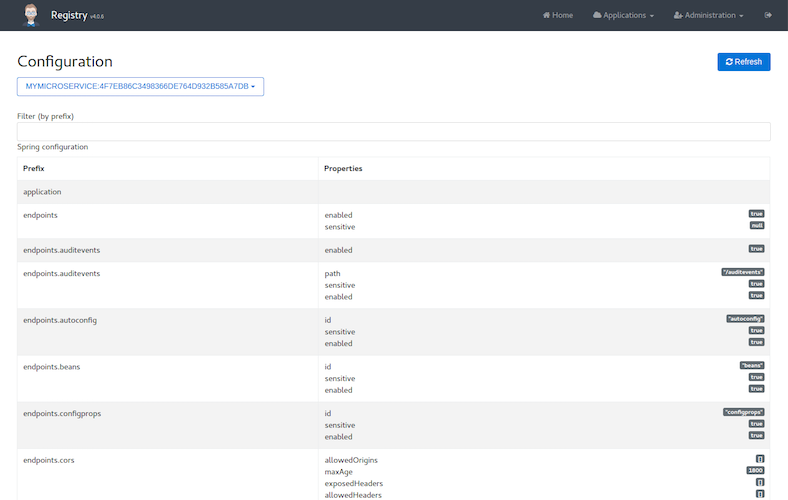
The configuration dashboard uses Spring Boot Actuator's configuration endpoint to give a full view of the Spring configuration of the current application.
The logs dashboard
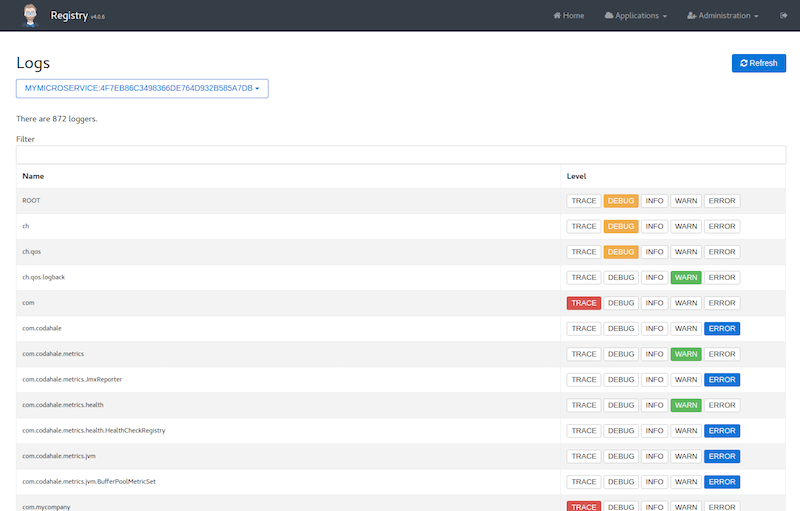
The logs dashboard allows to manage at runtime the Logback configuration of the running application. You can change the log level of Java package by clicking on a button, which is very convenient both in development and in production.
Securing the JHipster Registry
The JHipster Registry is secured by default. You can login using the usual "admin/admin" login and password that are used in normal JHipster applications.
Applications also connect to the JHipster Registry using that same "admin" user, but use HTTP Basic authentication. So if your microservices cannot access the registry, and you see some "401 authentication error" messages, it is because you have misconfigured those applications.
In order to secure your JHipster Registry:
- You must change the default "admin" password. This password is set using the standard Spring Boot property
spring.security.user.password, so you can use the usual Spring Boot mechanisms to modify it: you could modify the project'sapplication-*.ymlfiles, or add aSPRING_SECURITY_USER_PASSWORDenvironment variable. The Docker Compose sub-generator uses the environment variable method. - As your applications will connect to the registry using HTTP, it is very important to secure that connection channel. There are many ways to do it, and the easiest one is probably to use HTTPS.