Security
To use Spring Security with a Single Web Page Application, like the ones generated by JHipster, you need XHR login/logout/error views. We have configured Spring Security in order to use those views correctly, and we generate all the JavaScript and HTML code for you.
By default, JHipster comes with two different users:
- "user", who is a normal user with "ROLE_USER" authorization. The default password is "user".
- "admin", who is an admin user with "ROLE_USER" and "ROLE_ADMIN" authorizations. The default password is "admin".
The two authorizations "ROLE_USER" and "ROLE_ADMIN" provide the same access to the entities, which means that a "user" is authorized to perform the same CRUD operations as an "admin". This behavior can be an issue when the application goes to production because a "user" can, for example, delete any entities. More details on improving access-control can be found in this blog post.
For security reasons, you should change those default passwords in production.
JSON Web Tokens (JWT)
JSON Web Token (JWT) authentication is a stateless security mechanism, so it's a good option if you want to scale your application on several different servers.
Please note that this is the default option when using a microservices architecture.
This authentication mechanism doesn't exist by default with Spring Security, it's a JHipster-specific integration of the Java JWT project.
This solution uses a secure token that holds the user's login name and authorities. As the token is signed, it cannot be altered by a user.
JHipster automatically tracks invalid JWTs as an custom application metric, refer to the monitoring documentation.
Securing JWT
- JHipster uses a secret key, which can be configured using two Spring Boot properties:
jhipster.security.authentication.jwt.secretandjhipster.security.authentication.jwt.base64-secret. The second option uses a Base64-encoded string, so it is considered more secured and thus it is recommended. If both properties are configured, thesecretproperty (less secured) will be used, for legacy reasons. A warning will be shown at application startup if you don't use the Base64 property. - Those keys should have a minimum length of 512 bits: if they are not long enough, you will not be able to use them to login. If that happens, there will be a clear warning at the console to explain that issue.
- The secret keys are configured in the
application-*.ymlfiles. As those keys must be kept secret, you should store them in a secure way for your production profile. It can be set up using the usual Spring Boot property configuration: using a Spring Cloud Config server like the JHipster Registry, using an environment variable, or even a specificapplication-prod.ymlfile which is SCP'd by a sysadmin into the same directory as your application's executable WAR file. - You should change the default "user" and "admin" passwords. The easiest way to do this is to deploy your application, login as "user/user" and then "admin/admin", and for each of them use the "Account > Password" menu to change the password.
Session-based authentication
This is the "classical" Spring Security authentication mechanism, but we have improved it quite significantly. It uses the HTTP Session, so it is a stateful mechanism: if you plan to scale your application on multiple servers, you need to have a load balancer with sticky sessions so that each user stays on the same server or consider adding Spring Session to store the sessions in a database rather than in memory.
Securing Session-based authentication
- For remember-me authentication, the remember-me key is configured in the
application-dev.ymlandapplication-prod.ymlfiles, as thejhipster.security.remember-me.keyproperty. As this key must be kept secret, you should store it in a secure way for your production profile. It can be set up using the usual Spring Boot property configuration: using a Spring Cloud Config server like the JHipster Registry, using an environment variable, or even a specificapplication-prod.ymlfile which is SCP'd by a sysadmin into the same directory as your application's executable WAR file. - You should change the default "user" and "admin" passwords. The easiest way to do this is to deploy your application, login as "user/user" and then "admin/admin", and for each of them use the "Account > Password" menu to change the password.
Improved remember-me mechanism
We have modified the Spring Security remember-me mechanism so that you have a unique token, that is stored in your database (SQL or NoSQL database, depending on your choice during generation!). We also store more information than the standard implementation, so you have a better understanding of where those tokens come from: IP address, browser, date... And we generate a complete administration screen, so that you can invalidate sessions, for example if you forgot to log out on another computer.
Cookie theft protection
We have added a very complete cookie theft protection mechanism: we store your security information in a cookie, as well as in the database, and each time a user logs in we modify those values and check if they have been altered. That way, if someone ever steals your cookie, they will be able to use it only once, at most.
OAuth 2.0 and OpenID Connect
OAuth is a stateful security mechanism, like HTTP Session. Spring Security provides excellent OAuth 2.0 and OIDC support, and this is leveraged by JHipster. If you're not sure what OAuth and OpenID Connect (OIDC) are, please see What the Heck is OAuth?
Keycloak
Keycloak is the default OpenID Connect server configured with JHipster.
To log into your application, you'll need to have Keycloak up and running. The JHipster Team has created a Docker container for you that has the default users and roles. Start Keycloak using the following command.
docker-compose -f src/main/docker/keycloak.yml up
Alternatively, you can use npm as follows:
npm run docker:keycloak:up
If you want to use Keycloak with Docker Compose, be sure to read our Docker Compose documentation, and configure correctly your /etc/hosts for Keycloak.
Note for JHipster 7.8.1 and Keycloak 16.1.0 on Apple Silicon (M1)
Keycloak prior to v18 may misbehave on Apple Silicon in compatibility mode and the solution is not obvious. You can build the Keycloak image locally to solve the problem:
cd keycloak-containers/server
git checkout 16.1.0
docker build -t jboss/keycloak:16.1.0 .
The security settings in src/main/resources/config/application.yml are configured for this image. See above note on /etc/hosts and take note that issuer-uri may need to change
spring:
  ...
  security:
    oauth2:
      client:
        provider:
          oidc:
            issuer-uri: http://localhost:9080/auth/realms/jhipster
            # localhost will be bound to the guest (container), not the host
            # to run Keycloak as a daemon, i.e., npm run docker:keycloak:up, /etc/hosts must be edited
            # and the issuer-uri should be as follows:
            # issuer-uri: http://keycloak:9080/auth/realms/jhipster
        registration:
          oidc:
            client-id: web_app
            client-secret: web_app
            scope: openid,profile,email
Keycloak uses an embedded H2 database by default, so you will lose the created users if you restart your Docker container. To keep your data, please read the Keycloak Docker documentation. One solution, with keeping the H2 database, is to do the following:
- Add a volume that will be persisted:
./keycloak-db:/opt/jboss/keycloak/standalone/data - Change the migration strategy from
OVERWRITE_EXISTING, toIGNORE_EXISTING(in the command section)
In production, it is required by Keycloak that you use HTTPS. There are several ways to achieve this, including using a reverse proxy or load balancer that will manage HTTPS. We recommend that you read the Keycloak HTTPS documentation to learn more about this topic.
Auth0
If you'd like to use Auth0 instead of Keycloak, follow the configuration steps below:
- Configure using Auth0 Dashboard
- Configure using Auth0 CLI
Configure using Auth0 Admin Dashboard
-
Create a free developer account at https://auth0.com/signup. After successful sign-up, your account shall be associated with a unique domain like
dev-xxx.us.auth0.com -
Create a new application of type
Regular Web Applications. Switch to theSettingstab, and configure your application settings like:- Allowed Callback URLs:
http://localhost:8080/login/oauth2/code/oidc - Allowed Logout URLs:
http://localhost:8080/ - NOTE: If you're using Consul, add URLs for port 8500 too.
- NOTE: If you're using the JHipster Registry, add URLs for port 8761 too.
- Allowed Callback URLs:
-
Navigate to User Management > Roles and create new roles named
ROLE_ADMIN, andROLE_USER. -
Navigate to User Management > Users and create a new user account. Click on the Role tab to assign roles to the newly created user account.
-
Navigate to Actions > Flows and select Login. Create a new action named
Add Rolesand use the default trigger and runtime. Change theonExecutePostLoginhandler to be as follows:exports.onExecutePostLogin = async (event, api) => {const namespace = 'https://www.jhipster.tech';if (event.authorization) {api.idToken.setCustomClaim('preferred_username', event.user.email);api.idToken.setCustomClaim(`${namespace}/roles`, event.authorization.roles);api.accessToken.setCustomClaim(`${namespace}/roles`, event.authorization.roles);}} -
Select Deploy and drag the
Add Rolesaction to your Login flow.
Configure JHipster Application to use Auth0 as OIDC Provider
In your JHipster application, modify src/main/resources/config/application.yml to use your Auth0 settings:
spring:
  ...
  security:
    oauth2:
      client:
        provider:
          oidc:
            # make sure to include the ending slash!
            issuer-uri: https://{your-auth0-domain}/
        registration:
          oidc:
            client-id: {clientId}
            client-secret: {clientSecret}
            scope: openid,profile,email,offline_access
jhipster:
  security:
    oauth2:
      audience: https://{your-auth0-domain}/api/v2/
If you have a doubt on the issuer-uri value, then, you can get the value from Applications > {Your Application} > Settings > Advanced Settings > Endpoints > OpenID Configuration. Remove .well-known/openid-configuration suffix since that will be added by the Spring Security.
You can use the default Auth0 Management API audience value from the Applications > API > API Audience field. You can also define your own custom API and use the identifier as the API audience.
- Before running
Cypresstests, specifyAuth0user details by overriding theCYPRESS_E2E_USERNAMEandCYPRESS_E2E_PASSWORDenvironment variables. Refer to Cypress documentation for more details.
export CYPRESS_E2E_USERNAME=<your-username>
export CYPRESS_E2E_PASSWORD=<your-password>
Note: Auth0 requires a user to provide authorization consent on the first login. Consent flow is currently not handled in the Cypress test suite. To mitigate the issue, you can use a user account that has already granted consent to authorize application access via interactive login.
Use Environment Variables
You can also use environment variables to override the defaults. For example:
export SPRING_SECURITY_OAUTH2_CLIENT_PROVIDER_OIDC_ISSUER_URI="https://{your-auth0-domain}/"
export SPRING_SECURITY_OAUTH2_CLIENT_REGISTRATION_OIDC_CLIENT_ID="{client-id}"
export SPRING_SECURITY_OAUTH2_CLIENT_REGISTRATION_OIDC_CLIENT_SECRET="{client-secret}"
export JHIPSTER_SECURITY_OAUTH2_AUDIENCE="https://{your-auth0-domain}/api/v2/"
You can put this in an ~/.auth0.env file and run source ~/.auth0.env to override the default Keycloak settings with Auth0 and start your app with Maven or Gradle. You should be able to sign in with the credentials you registered with.
Note: If you're on Windows, you should install WSL so the source command will work.
Create a Native App for Mobile on Auth0
If you're developing a mobile app with JHipster's Ionic or React Native blueprints, you will need to create a native app on Auth0 if you're using OIDC.
-
Create a Native app and add the following Allowed Callback URLs:
- Ionic:
http://localhost:8100/callback,dev.localhost.ionic:/callback - React Native:
http://localhost:19006/,https://auth.expo.io/@<username>/<appname>
- Ionic:
-
Set the Allowed Logout URLs to:
- Ionic:
http://localhost:8100/logout,dev.localhost.ionic:/logout - React:
http://localhost:19006/,https://auth.expo.io/@<username>/<appname>
- Ionic:
-
Set the Allowed Origins (CORS):
- Ionic:
http://localhost:8100,capacitor://localhost,http://localhost - React Native:
http://localhost:19006
- Ionic:
Update Your Ionic App
Update ionic/src/environments/environment.ts to use the generated client ID. The value for server_host will be looked up from your JHipster app (at /api/auth-info), but you can define it as a fallback value. You'll also need to specify the audience. For example:
const oidcConfig: IAuthConfig = {
  client_id: '<native-client-id>',
  server_host: 'https://<your-auth0-domain>/',
  ...
};

export const environment = {
  ...
  audience: 'https://<your-auth0-domain>/api/v2/',
  ...
};
Restart your Ionic app and log in with Auth0!
Update Your React Native App
Copy the client ID to app/config/app-config.js.
Update the audience in app/modules/login/login.utils.ts:
audience: 'https://<your-auth0-domain>/api/v2/',
Restart your React Native app and log in with Auth0!
Okta
If you'd like to use Okta instead of Keycloak, it's pretty quick using the Okta CLI. After you've installed it, run:
okta register
Then, in your JHipster app's directory, run okta apps create jhipster. This will set up an Okta app for you, create ROLE_ADMIN and ROLE_USER groups, create a .okta.env file with your Okta settings, and configure a groups claim in your ID token.
Run source .okta.env and start your app with Maven or Gradle. You should be able to sign in with the credentials you registered with.
If you're on Windows, you should install WSL so the source command will work.
If you'd like to configure things manually through the Okta Admin Console, see the instructions below.
Create an OIDC App with the Okta Admin Console
First, you'll need to create a free developer account at https://developer.okta.com/signup. After doing so, you'll get your own Okta domain, that has a name like https://dev-123456.okta.com.
Modify src/main/resources/config/application.yml to use your Okta settings. Hint: replace {yourOktaDomain} with your org's name (e.g., dev-123456.okta.com).
security:
  oauth2:
    client:
      provider:
        oidc:
          issuer-uri: https://{yourOktaDomain}/oauth2/default
      registration:
        oidc:
          client-id: {client-id}
          client-secret: {client-secret}
          scope: openid,profile,email
Create an OIDC App in Okta to get a {client-id} and {client-secret}. To do this, log in to your Okta Developer account and navigate to Applications > Applications > Add Application > Create New App. Select Web, OpenID Connect, and click Create. Give the app a name you'll remember, and specify http://localhost:8080/login/oauth2/code/oidc as a Login redirect URI. Add http://localhost:8080 as a Logout redirect URI and click Save. Copy the client ID and secret into your application.yml file.
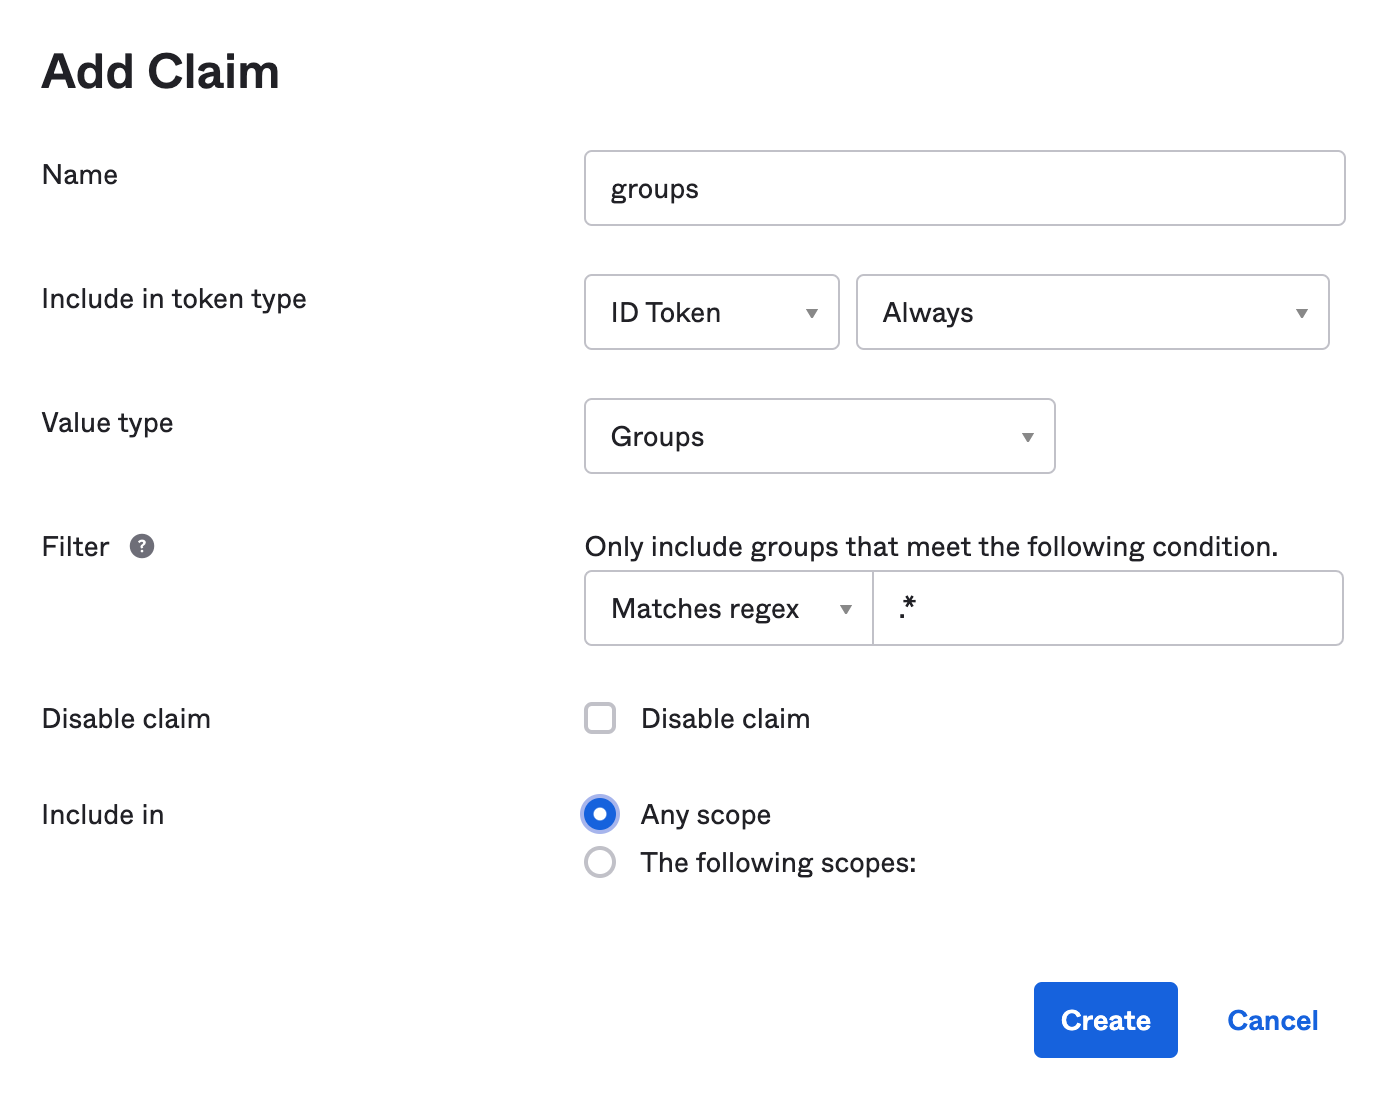
Create a ROLE_ADMIN and ROLE_USER group (Directory > Groups > Add Group) and add users to them. You can use the account you signed up with, or create a new user (Directory > People > Add Person). Navigate to Security > API > Authorization Servers, and click on the default server. Click the Claims tab and Add Claim. Name it groups, and include it in the ID Token. Set the value type to Groups and set the filter to be a Regex of .*. Click Create.
After making these changes, you should be good to go! If you have any issues, please post them to Stack Overflow. Make sure to tag your question with "jhipster" and "okta".
To use Okta when running e2e tests, you can set environment variables.
export CYPRESS_E2E_USERNAME=<your-username>
export CYPRESS_E2E_PASSWORD=<your-password>
If you're using Protractor, remove the CYPRESS_ prefix.
Use Environment Variables
You can also use environment variables to override the defaults. For example:
export SPRING_SECURITY_OAUTH2_CLIENT_PROVIDER_OIDC_ISSUER_URI="https://{yourOktaDomain}/oauth2/default"
export SPRING_SECURITY_OAUTH2_CLIENT_REGISTRATION_OIDC_CLIENT_ID="{client-id}"
export SPRING_SECURITY_OAUTH2_CLIENT_REGISTRATION_OIDC_CLIENT_SECRET="{client-secret}"
You can put this in an ~/.okta.env file and run source ~/.okta.env to override Keycloak with Okta.
You can then set these properties when you deploy to Heroku:
heroku config:set \
  SPRING_SECURITY_OAUTH2_CLIENT_PROVIDER_OIDC_ISSUER_URI="$SPRING_SECURITY_OAUTH2_CLIENT_PROVIDER_OIDC_ISSUER_URI" \
  SPRING_SECURITY_OAUTH2_CLIENT_REGISTRATION_OIDC_CLIENT_ID="$SPRING_SECURITY_OAUTH2_CLIENT_REGISTRATION_OIDC_CLIENT_ID" \
  SPRING_SECURITY_OAUTH2_CLIENT_REGISTRATION_OIDC_CLIENT_SECRET="$SPRING_SECURITY_OAUTH2_CLIENT_REGISTRATION_OIDC_CLIENT_SECRET"
Create a Native App for Mobile on Okta
If you're developing a mobile app with JHipster's Ionic or React Native blueprints, you will need to create a native app on Okta if you're using OIDC.
Using the Okta CLI, run okta apps create. Select the default app name, or change it as you see fit. Choose Native and press Enter.
- Ionic: Change the Redirect URI to
[http://localhost:8100/callback,dev.localhost.ionic:/callback]and the Logout Redirect URI to[http://localhost:8100/logout,dev.localhost.ionic:/logout]. - React Native: Use
[http://localhost:19006/,https://auth.expo.io/@<username>/<appname>]for redirect URIs.
NOTE: dev.localhost.ionic is the default scheme, but you can also use something more traditional like com.okta.dev-133337 (where dev-133337.okta.com is your Okta Org URL). If you change it, be sure to update the scheme in your Ionic app's src/environments/environment.ts.
The Okta CLI will create an OIDC App in your Okta Org. It will add the redirect URIs you specified and grant access to the Everyone group.
Okta application configuration:
Issuer:    https://dev-133337.okta.com/oauth2/default
Client ID: 0oab8eb55Kb9jdMIr5d6
NOTE: You can also use the Okta Admin Console to create your app. See Create a Native App for more information.
Update Your Ionic App
Open ionic/src/environments/environment.ts and add the client ID from your Native app. The value for server_host will be looked up from your JHipster app (at /api/auth-info), but you can define it as a fallback value. For example:
oidcConfig: {
  client_id: '<native-client-id>',
  server_host: 'https://<your-okta-domain>/oauth2/default',
  ...
}
You'll also need to add a trusted origin for http://localhost:8100. In your Okta Admin Console, go to Security > API > Trusted Origins > Add Origin. Use the following values:
- Name:
http://localhost:8100 - Origin URL:
http://localhost:8100 - Type: Check both CORS and Redirect
Click Save.
Restart your Ionic app and log in with Okta!
Update Your React Native App
Copy the client ID to app/config/app-config.js.
Restart your Ionic app and log in with Okta!
OpenID Connect Tutorials
See Use OpenID Connect Support with JHipster to learn more about JHipster 5 and OIDC with Okta.
If you're using JHipster 6, see Better, Faster, Lighter Java with Java 12 and JHipster 6. If you're using microservices with JHipster 6, see Java Microservices with Spring Cloud Config and JHipster.
For JHipster 7, see Reactive Java Microservices with Spring Boot and JHipster.
The Okta developer blog also has some ❤️ for Micronaut and Quarkus:
- Build a Secure Micronaut and Angular App with JHipster
- Fast Java Made Easy with Quarkus and JHipster
HTTPS
You can force the use of HTTPS by adding the following configuration to your SecurityConfiguration.java.
// Spring MVC
http.requiresChannel(channel -> channel
    .requestMatchers(r -> r.getHeader("X-Forwarded-Proto") != null).requiresSecure());

// WebFlux
http.redirectToHttps(redirect -> redirect
    .httpsRedirectWhen(e -> e.getRequest().getHeaders().containsKey("X-Forwarded-Proto")));
See Spring Security's Servlet and WebFlux documentation for more information.
This has been tested and known to work on Heroku and Google Cloud. For more production tips on Heroku, see Preparing a Spring Boot App for Production on Heroku.
Leakage of implementation details
Every failure/exception is mapped to a problem datastructure and returned to the client.
{
  "type": "https://www.jhipster.tech/problem/problem-with-message",
  "title": "Service Unavailable",
  "status": 503,
  "detail": "Database not reachable"
}
While JHipster does not include any stacktraces by default the detail contains the message of an exception which might reveal
technical details you do not want to be exposed via the API.
{
  "type": "https://www.jhipster.tech/problem/problem-with-message",
  "title": "Bad Request",
  "status": 400,
  "detail": "JSON parse error: Cannot deserialize instance of
       `java.util.LinkedHashMap<java.lang.Object,java.lang.Object>` out of VALUE_NUMBER_INT token; nested exception is com.fasterxml.jackson.databind.exc.MismatchedInputException: Cannot deserialize instance of `java.util.LinkedHashMap<java.lang.Object,java.lang.Object>`
       out of VALUE_NUMBER_INT token\n at [Source: (PushbackInputStream); line: 1, column: 1]"
}
To prevent this JHipster provides a dedicated mechanism to mitigate leakage of implementation details by
- checking well known exception and replacing the message with a generic message (e.g.
Unable to convert http message) - checking if the message contain potential package names (e.g.
java.or.org) and replacing the message with a generic one (e.g.Unexpected runtime exception)
The logs still contain the detailed exception so you can still identify the real issue while an attacker from the outside is not able to gain valuable technical details by miusing your api.
In case you need to modify the logic (e.g. the message still contains technical details but was not detected) you can do so by
adding the required logic to the prepare method in ExceptionTranslator.java