JHipster-UML
このプロジェクトは非推奨であり、今後使用すべきではないことに注意してください(訳注:そのため訳も「はじめに」までに止めています)。
代わりに、このプロジェクトのJDLエクスポート機能を使用して、XMIファイルをJDLファイルにエクスポートすることをお勧めします。このファイルを使用して、JDL Studioでエンティティのモデルを作成できます。
JDLの詳細については、ここを参照してください。
JHipster-UMLは、エンティティサブジェネレータを使用する代わりに使用できるJHipsterサブプロジェクトです。リレーションシップを管理するは、従来のYeomanの質問と回答を使用するよりも、視覚的なツールを使用する方がはるかに簡単です。
JHipster-UMLプロジェクトはGitHubで利用可能であり、JHipster(Apache 2.0ライセンス)のようなオープンソースプロジェクトです。このプロジェクトが気に入った場合は、GitHubで私たちに星を与えることを忘れないでください!
このページの内容は次のとおりです。
- はじめに
- 問題とバグ
- インストール
- JHipsterの使い方-UML
4.1. UMLファイル
4.2. JHipster-UMLを使用する
4.3. 生成されるもの
4.4. JHipsterメモ
4.5. 予約語 - 例
5.1. Modelio
5.2. UMLデザイナー
5.3. GenMyModel
5.4. その他の編集者
5.5. 列挙
5.6. テーブル名
5.7. 必須の関係 - テスト
- コントリビューション:課題と機能強化
7.1. パーサーの変更 - 付録
はじめに
JHipster-UMLは、通常のQ&Aに代わるもので、UMLエディタを使用してJHipster-UMLで解析される図を作成できます。
私たちがサポートしているエディタのリストは以下のとおりです。
- Modelio;
- UML Designer;
- GenMyModel(無料ではありませんがオンラインです)
Issues and bugs
JHipster-UML is available on GitHub, and follows the same contributing guidelines as JHipster.
Please use our project for submitting issues and Pull Requests:
When submitting anything, you must be as precise as possible:
- One posted issue must only have one problem (or one demand/question);
- Pull requests are welcome, but the commits must be 'atomic' to really be understandable.
Please note that using JHipster-UML (or JHipster) might be troublesome (one has to install some tools to really be able to use the Node environment without any issue). This link may help if you encounter an issue on Windows.
Another issue that can be encountered on Windows is this one. The link provides a solution to fix that if such a thing happens.
Finally, an issue has been reported from a Windows user using Git Bash. The JHipster generator's questions (from InquirerJS) could not work (the user is stuck when answering the questions). You might want to use Powershell or another shell when using JHipster UML (or JHipster).
Installation
To install JHipster UML use the command:
npm install -g jhipster-uml
If, however, you don't want to install the latest version globally because it doesn't match your version of the generator (see below) or if you want it contained locally, use this command instead:
npm install jhipster-uml --save-dev
If you want the 'bleeding edge' (almost perfectly safe to use) version, you can clone our git repo from our GitHub project:
git clone https://github.com/jhipster/jhipster-uml.git for HTTPS
git clone [email protected]:jhipster/jhipster-uml.git for SSH
JHipster UML is a tool that can be used with the JHipster's generator. If you're using the generator before v3.0.0, then you must use JHipster UML v1.6.5 (latest patch release). Otherwise, using v2.0.0+ is the choice for v3.0.0+ of the generator.
How to use it
To use JHipster-UML, you need a class diagram exported in XMI and JHipster-UML will parse it to create your entities.
The UML file
The class diagram should modelize the entities of your JHipster application domain, thus you have restrictions, you have to follow the methodology.
Entities
Each entity is represented by a class, its fields are the class' attributes. An attribute must have a type supported by JHipster, otherwise it won't work. To have JHipster supported types like “BigDecimal”, “LocalDate”..., you can create a PrimitiveType or a DataType for it. You can look at the tables with all the types supported by JHipster and the validations you can use for each here.
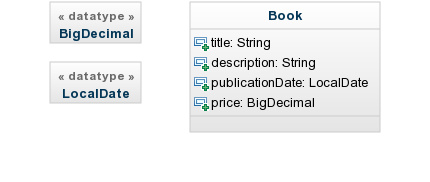
Here is an example of a properly created class for JHipster. We have the attributes publicationDate and price set with the types BigDecimal and LocalDate we created as DataType.
Note that you don't need to capitalize type names (except for composed names like BigDecimal, JHipster-UML capitalizes names).
Relationships
We use the examples from JHipster in order to show how to do it with an editor. Please note that we only support the relationships listed in the Managing relationships page.
One-to-One

Here, we have a bidirectional one-to-one relationship between Driver and Car, with Driver as the owner of the relationship.
If you're looking for a unidirectional relationship:

Notice that in order to achieve a unidirectional relationship we removed the citizen label so that Passport doesn't have it.
One-to-Many

In this bidirectional relationship, an Owner can have many cars, and a Car can have only one owner.
Unidirectional relationships for One-to-Many relationships are not (yet) supported by JHipster (see this page for more information about this). This is an example of such an association:

Many-to-One
As showed previously, the equivalent of a One-to-Many relationship is a Many-to-One:

Now the cars know their owner, but not the opposite.
Many-to-Many

Here, we have a many-to-many relationship between Car (the owner) and Driver.
Declare the field you want to use to display a relationship in Angular
To do that you must add the field name between (``) after the injected field name.
In a One-to-Many relationship you can add it in the 'Many' side of the relationship:
-
UML

-
JDL
relationship OneToMany {One{many} to Many{one(<otherEntityField>)}}
In a Many-to-Many relationship you can add it in the owner side of the entity:
-
UML

-
JDL
relationship ManyToMany {Owner{notOwner(<otherEntityField>)} to NotOwner{owner}}
Reflexivity cases
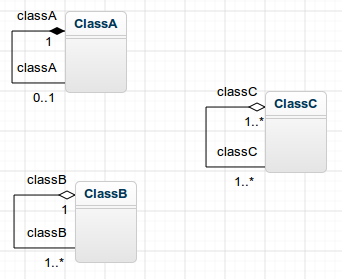
As you can see, there are 3 types of reflexivity. JHipster-UML only supports the first two (one-to-one and one-to-many). The many-to-many case is not supported because:
- It can lead to over-complexified and wrong models;
- JHipster doesn't support it (this is a good thing).
A complete example
We use a diagram from the Oracle HR example available here.
Here's a screenshot of such a diagram (from Modelio):
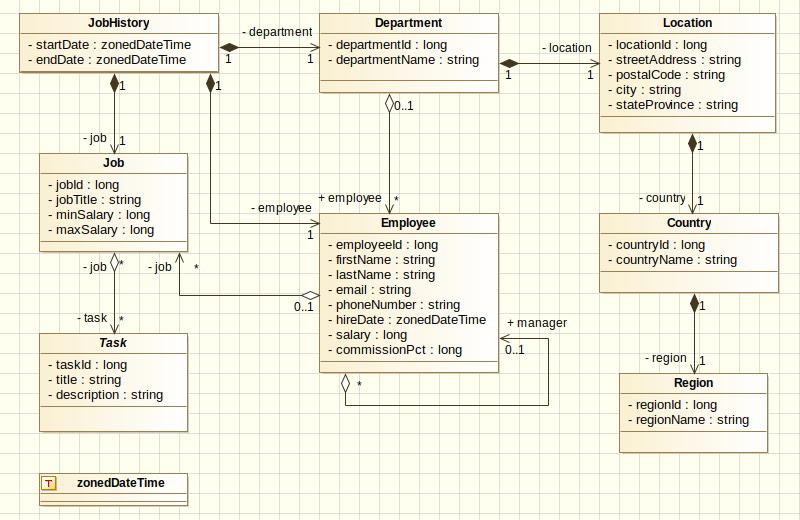
As you can see, we changed it as to make it a bit more interesting. JHipster can generate entities and associations between them (one-to-one, one-to-many, etc.), and in this example we added every type of association (even the reflexive and the inheritance). JHipster doesn't support inheritance yet (but reflexivity is supported by JHipster, with a warning), but we decided to include it in the example so as to have a solid base to work with.
Use JHipster-UML
Once you have your JHipster application set up and your class diagram in a UML editor, follow these steps:
- step 1 - export your class diagram to the XMI file format
- step 2 - in your JHipster application root folder, run the command
jhipster-uml <your_file.xmi>
Note that you don't need to supply the database type (sql, mongodb, or cassandra), as JHipster-UML detects the type for you (from the .yo-rc.json file).
If, however, you wish to run JHipster-UML outside a JHipster app, you need to pass an extra argument: the database type name. Here is the command to run:
jhipster-uml <your_file.xmi> [--db (sql | mongodb | cassandra)]
The JHipster DTOs can be generated too, pass the --dto arg to enable this feature.
jhipster-uml <your_file.xmi> [--db (sql | mongodb | cassandra)] [--dto]
You can choose the pagination for your entities using --paginate.
jhipster-uml <your_file.xmi> [--db (sql | mongodb | cassandra)] [--paginate]
Finally, you can choose the service for your entities using --service.
jhipster-uml <your_file.xmi> [--db (sql | mongodb | cassandra)] [--service]
Please note that using the paginate option and not selecting any entity to generate the pagination for cancels your choice of using this option.
Finally, if you need help, there's a command for that too:
jhipster-uml --help
- step 3 - that's it!
Note: If you want to use the classes and methods available, the preferred entry point of JHipster-UML is the ParserFactory (so that you don't open the file, read it, find the root element, etc.).
JHipster-UML file
JHipster-UML can be configured by the command line and / or by a JSON based configuration file, the jumlfile.
The options described in the help can be used in the both but the command line take precedence over the jumlfile.
A concrete example
jumlfile content:
{
  "db": "sql",
  "force": "true"
}
Call:
jhipster-uml --no-force
You Will have the following options:
- db: sql
- force: false (without force)
What's generated
After executing JHipster-UML, the .jhipster folder will be created (if it didn't exist before) and filled with the entities present in the XMI file in the JSON format.
Please note that one entity may, at least, not be generated: the User entity. It is actually scaffolded by JHipster when creating a new app (and a warning message is displayed by JHipster-UML).
Next, it's pretty straightforward: run your app!
JHipster notes
JHipster is a great scaffolding tool with many conventions, some of them are worth mentioning when generating entities with JHipster-UML:
- You don't have to use an
idfield in your entities because JHipster generates one by default, and JHipster-UML removes any field if it is detected as an ID; - You don't have to use the plural form in your relationships, JHipster adds an
swhen needed. For instance, if there's a many-to-many relationship between entity A and entity B, you don't have to name the relationship's endasorbsbecause JHipster will do that for you.
Reserved words
JHipster maintains a list of forbidden (under some conditions) words.
For instance, if you want to generate entities for your app, and if this app uses Cassandra, you can't use the words BATCH in either a field name or a table name.
As of v2.0.0, JHipster UML detects such words and immediately throws an exception if it encounters such a case. However, JHipster UML can't assert with 100% accuracy when a reserved word can or can't be used. That's why it warns the user with a yellow message when there could be a risk of using such a keyword.
Examples
Each editor will be discussed here, so that you know how to get a good XMI file.
Note : JHipster-UML can detect faulty XMI files, it will display the first error it finds and exit right away (fail-fast behavior).
In JHipster-UML, each editor has been tested with the Oracle example. If you wish to see the examples in a "dummy project", you have to download these files for each editor, and test JHipster and JHipster-UML:
- For Modelio: modelio.xmi;
- For UML Designer: umldesigner.uml;
- For GenMyModel: genmymodel_evolve.xmi.
Modelio
Note for Mac users: Modelio is behaving weirdly on Mac (the GUI), it may be caused by the graphics and window manager on Mac, as it has not been diagnosed on Linux Ubuntu. It works, but the interaction may not be pleasant.
Important version notes:
- Modelio v3.3 is tested and working, however a bug exists in v3.4 preventing the user from exporting the diagram. This bug is fixed as of v3.4.1.
- Modelio v3.5.X introduces a bug when dealing with bidirectional Many-to-Many relationships (the error when JHipster UML parses the XMI is
Cannot read property '0' of undefined). This problem seems to have been fixed in later version (v3.6.X).
Modelio can be downloaded for free here. Make sure you have Java 8 if you're downloading any of the 3.3+ versions (it won't work otherwise).
The example file is here.
Once launched, create a project and you'll be seeing this view:
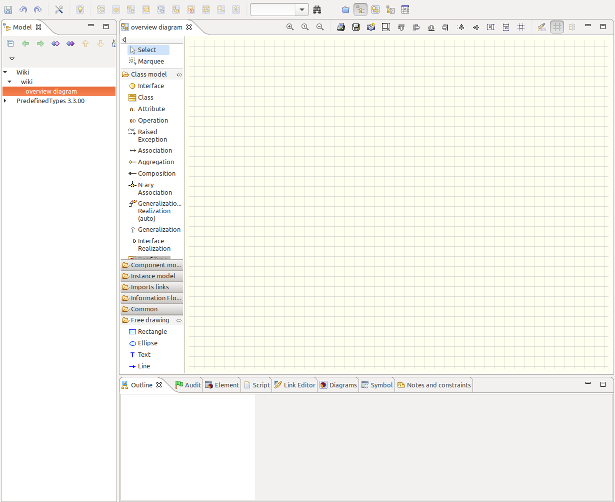
Notice the left panel entitled 'Class Model'. You only need the 'Class', 'Attributes', 'Aggregation', 'Composition' and 'Data Type' objects. You can already guess why you need the first 2. The 'Aggregation' object is used to defined aggregations: B is aggregated to A means that A has 0, 1 or more (n) instances of B. A doesn't create (and destroy) B instances. Composition means that if A is composed of B (0, 1, or n instances), then it creates, manages and destroys B instances.
You can use either of them, the parser will only see the two as associations anyway.
In both situations, cardinalities and association names are important.
Finally, 'Data Types' objects enables you to create custom types (types that are not proposed by Modelio), like BigDecimal, or LocalDate.
In this example, we'll explain how to connect two classes:

As you can see, employee has a job (but also can have no job at all). The parser will notice a few things:
- Two classes (Employee and Job);
- Two fields (email and title), their type, which class they belong (each class contains its fields). Their visibility is not taken into account;
- The association linking them and the direction of the association (it matters!)
- The cardinalities (1 and 0..1) mean that an employee can have a job (0 or 1), and a job isn't shared by two employees (only one, for this example's sake);
- There is one injected field: job, in employee.
This association is called a one-to-one. Go back a few sections to see the other types of associations.
Modelio supports constraints. Double-click on a field, go to the 'Notes and constraints' tab, the first icon should then be 'Add a constraint', then select 'Constraint', double-click on the constraint, and give it a name (it should be one of the JHipster constraints). For the constraint value, enter it the 'Body' field.
Finally, once your diagram is finished, you have to export it.
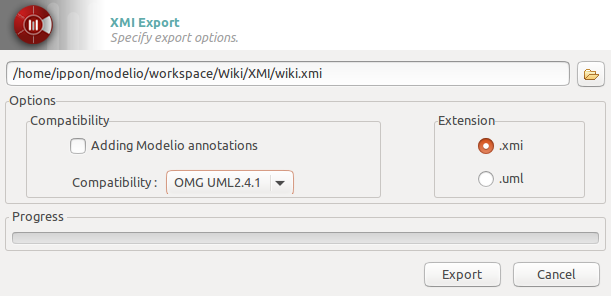
Check the Model perspective, once you locate your project, get down one level and right click the last element (you lower-cased project's name), XMI, Export XMI. A window should pop up, select the output path, change the compatibility to OMG UML2.4.1, leave the extension to XMI and you're ready to go.
Commenting
To comment a class (or an attribute), double-click on the element, select the Notes and constraints tab, and add a note.
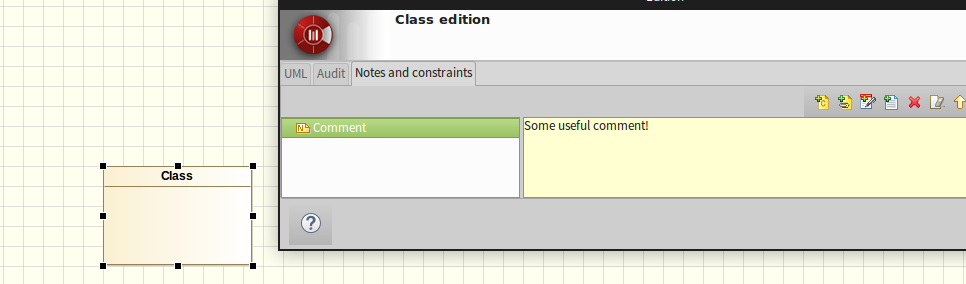
Please note that commenting relationships is not possible with this editor.
UML Designer
UML Designer can be downloaded here. It works the same way as Eclipse. To create an empty project, click on File -> New -> Modeling Project. Enter the name, and validate. If no file.uml is created, right-click on your project, and New -> Other -> UML Designer -> UML Model, and enter any name you want.
The example XMI file is available here.
You'll then be presented by a view like this one:
Double-click on 'Class diagram' under 'Design' category. You can now see on the right the 'Palette'. You only need these objects: 'Class', 'PrimitiveType', 'DataType' (both under 'Enumeration'), 'Composition' and 'Aggregation' (both under 'Association').
With UML Designer, you can create custom types by either using a DataType or a PrimitiveType (the parser recognizes both).
Here is an example using this editor:

To create attributes, double-click on the class, and add your attribute. You can import types by right-clicking somewhere on the diagram (in the white-space), then import Primitive Types, then select UML and Java. This will spare you the chore of creating types manually (with DataTypes or PrimitiveTypes).
Unfortunately, UML Designer doesn't support constraints yet.
One of the nice things UML Designer provides is that you don't need to export to XMI, go to your workspace, and you'll see that the saved project is already in the right format, so that's pretty cool.
Unidirectional relationships
This editor supports unidirectional relationships. To do that, create the relationship you want between your two classes, double-click on the relationship and tweak it.
Commenting
Commenting is possible for classes and attributes (not relationships): click on an element, and select comment to add your own.
GenMyModel
GenMyModel is an in-browser UML editor that can be found here. You can use it for free but with restrictions, we hope that this editor will enable users to fiddle around with JHipster-UML without the constraint of downloading an application.
The XMI file example is located here.
After signing up go in Projects -> New Projects, give a it name, in Model Type choose UML, in default diagram choose Class Diagram and then click on Create project. Then this screen will be displayed:
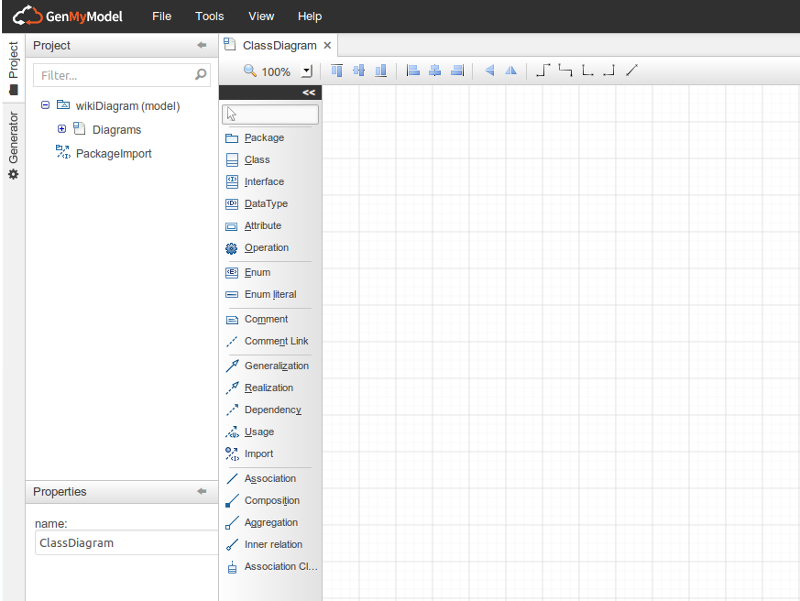
On the panel on the left of the grid, is all the elements possible to make a diagram. We will need only the elements 'Class', 'DataType', 'Attribute', 'Aggregation' and 'Composition'. You can use either 'Aggregation' or 'Composition', the parser will only see the association between two classes and its cardinality.
Here is an example on how to create two entities with a one-to-many relationship between them and the declaration of the JHipster types through 'DataType':
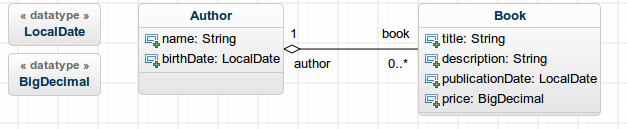
The parser will notice a few things:
- Two classes, 'Author' and 'Book'.
- Two DataTypes, 'LocalDate' and 'BigDecimal'.
- Attributes, you can set the type with the default ones, or with the declared DataTypes.
- An Aggregation between 'Author' and 'Book' (the direction matters!).
- Two injected field 'author' in Book and 'book' in Author.
- The cardinalities (1 and 0..*) mean that a Book can have one author and an Author can have several books, which correspond to a one-to-many relationship between Author and Book.
Unfortunately, you can not create custom constraints for attributes to fit the JHipster ones.
Once the diagram is done, you can export it to XMI. To do it, click on Tool -> Export as UML (XMI)
Unidirectional relationships
In GenMyModel, creating unidirectional relationships is pretty straightforward: remove the name from the field you don't want and you're good to go.
For instance, take this case:
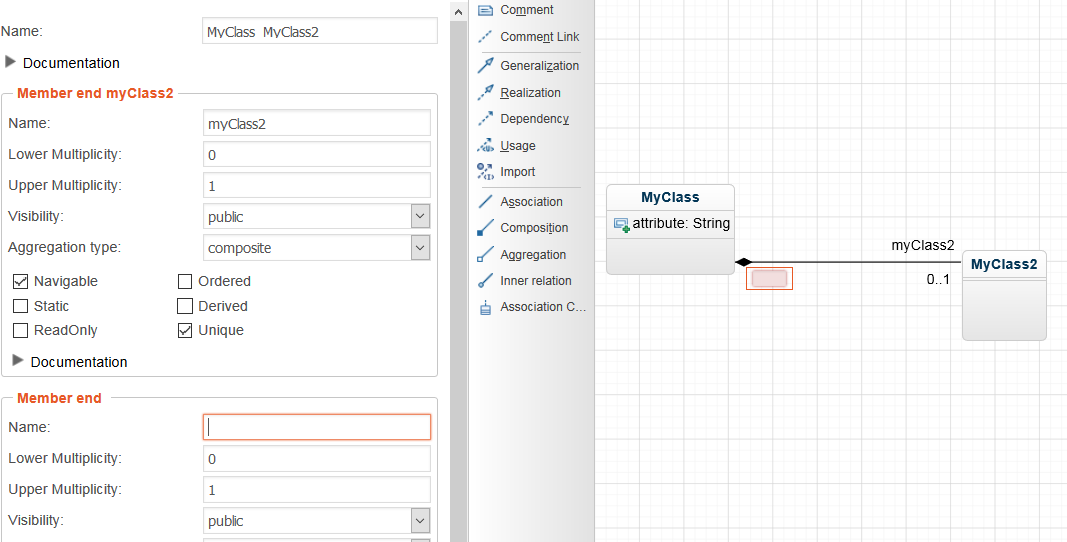
Here, MyClass will have a myClass2 attribute, but MyClass2 won't have a myClass field.
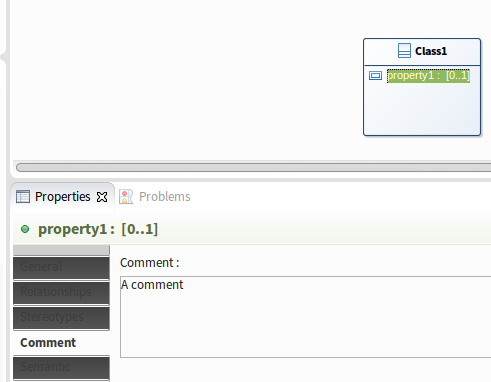
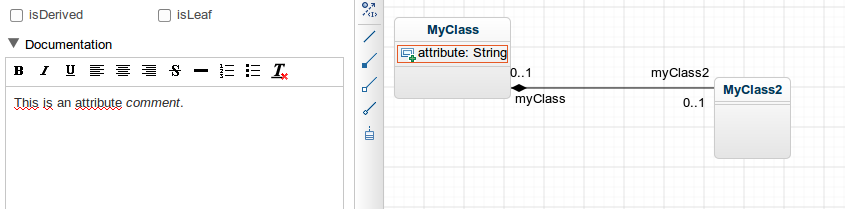
Commenting
Commenting is available for classes, attributes and relationship fields.
Click on an element and write a comment in the description field.
Other editors
Sparx EA
Support for dealing with this editor has been added by Guillaume Finance. Here is the repo, and you can read the presentation here.
Enumerations
JHipster and JHipster UML support both support enumerations.
Here's how you define them:
- For Modelio, drag and drop the
Enumerationobject and place it somewhere. Finally, add theEnumeration Literalobject to the enum to add it; - For UML Designer, there is the
Enumerationobject that can be placed and used. However, the literal is not calledEnumeration Literalbut onlyLiteral; - GenMyModel possess the objects needed:
EnumandEnum Literalin the main object panel (on the left hand side of the screen).
Table names
Since v1.6.2, it is now possible to specify table names for entities.
To do that, one has to specify the table name along with the class name like that:

The convention <ENTITY_NAME>\s*(<TABLE_NAME>) is universal no matter the editor.
However, if you don't want to pick a dedicated table name, you can write the class name. JHipster UML will take care of converting it to an appropriate table name. For instance, if you class name is MyClass, then your table name would be my_class.
Note that this feature is available for UML editors since v1.6.2.
Required relationships
As of v2.0.0, required relationships are possible to make. To specify one, make sure the end of the relationship to make required isn't "0" ("1", or "*" will do the trick). To see an example of that, remember the complete HR example from Oracle, and notice that the JobHistory class has 3 required relationships.
Testing JHipster-UML
The tests are available in the test folder and can be run via npm test.
We use Mocha for testing (along with chai and expect from chai).
If you want, an alternative command to run the tests, or run only the tests you want, is: mocha.
Please note that you need to be in the root directory for this command to work, and you also may need to install globally mocha with npm install -g mocha (or use the file in the node_modules folder, which is available to you provided you do npm install in JHipster-UML's directory).
If, however, you don't want to install everything globally, run:
npm installto install the mocha dependency,./node_modules/mocha/bin/mochato run the tests, please note that you may need to use the\on some "exotic" operating system/s.
Contributing: issues and enhancements
Because our tool isn't perfect (yet), you may notice some irregularities. GitHub provides a pretty nice issue tracker so that everyone can post about an issue. We follow the same guidelines as JHipster, with a few additions:
- Bugs found internally (by the JHipster-UML team) may be posted in the issue tracker, except for bugs regarding the supported UML editors.
- The same goes for enhancements.
Note: Post PRs and Issues on JHipster-UML's github page, here. Not on the main JHipster page.
Parser modifications
The 1.0.0 release brings a new parser system making any change (parser creation, update, deletion) hassle-free, provided the XMI can be parsed.
Adding a parser
Parser implementation
If you're a Java dev, you're probably quite familiar with OOP principles (we hope so anyway). When developing JHipster-UML, we thought of its architecture as we'd normally do in Java.
You have to "extend" our abstract parser (AbstractParser), or implement our interface (Parser) to add your concrete implementation of a parser.
You should notice that some methods of the Parser interface throw an UnimplementedOperationException. This idea is taken from Java, and you can implement this methods in your concrete parser.
Some methods don't throw any exception, but only call other methods. If you're familiar with Java 8, we copied its awesome default methods, and did the same (so that you don't manually implement them).
Like in Java, you can override any method you want, and create your own. You're not limited (except if you want to overload).
The AbstractParser class provides some fields, a default constructor and some methods so that you don't have to create or implement them later.
You should implement each of these methods (or override the #parse or #findElements methods).
The getters are not mandatory, but serve as a way of getting some important fields and provide a way to modify them before sending those fields.
Editor detection
When you're done creating your shiny new parser, you should add it to the "list" of available editors:
- Require it first just like here;
- Make it available just like here;
- Add it to the list just like here.
However, a few guidelines must be respected:
- Your parser's name must be <editor_parser>;
- The editor's JS file must not be upper-cased, and must not contain any whitespace, (Modelio ->
modelio_parser.js, UML Designer ->umldesigner_parser.js); - The editor's class name must be capitalized (Modelio ->
ModelioParser, UML Designer ->UMLDesignerParser).
Concerning the EditorDetector, it can detect the editor that created your XMI file. For that to happen, you must first locate where the editor is mentioned in the XMI file, and then add the code that returns your editor just like here. If your editor can't be detected, add it here, and indicate its name just like it has been done for UML Designer here.
Testing
Finally, the next thing you'll need to do before committing your super parser is test it. Because we believe in testing, but really like good testing (with BDD), our tests are done with Mocha and chai. If you don't know what it's all about yet, we recommend you visit the ChaiJS page, and see one of our test file to get acquainted with it.
You should probably wonder what form of testing you should use. The answer is: it's up to you! Whether it's should, or expect (à la RSpec), we don't enforce any rule here. We, however, recommend using Expect because we do, and it should keep the tests better to understand.
We just want you to test everything that is 'test-worthy':
- The interface's methods (the public methods not an interface class!);
- You're not obliged to test the other methods (private ones, because they are supposed to be safe and ever-changing in the short/long term), but as visibility is not implemented in JS (to our knowledge), you may want to test them (it's up to you).
The general guidelines for names and files:
- Your test file's name should respect the same rules as previously mentioned. For instance, if your parser's name is "Modelio", then your test file should be
modelio_parser_test.js. - The same goes for XMI files used for testing. If your parser's name is UMLDesigner, then one of your test XMI file's name can be
umldesigner_parser_problem_test.[...](the file extension is not static).
Modifying a parser
Changing a parser (and then committing the change) is pretty straightforward: do the change and test it (create tests if need be).
You can make an XMI file if you need a test to pass (exception throwing, or not, etc.).
Don't forget to modify the editor detector if you change any name.
Deleting a parser
First, remove it from the editors (editors/editors.js) and then remove it from the EditorDetector (editors/editor_detector.js). Finally, remove the parser file and the test created for it.
Don't forget to modify the editor detector if you delete any parser.
Annexes
Here is the types supported by this project:
| SQL | MongoDB | Cassandra | Validations |
|---|---|---|---|
| String | String | String | required, minlength, maxlength, pattern |
| Integer | Integer | Integer | required, min, max |
| Long | Long | Long | required, min, max |
| BigDecimal | BigDecimal | BigDecimal | required, min, max |
| Float | Float | Float | required, min, max |
| Double | Double | Double | required, min, max |
| Enum | Enum | - | required |
| Boolean | Boolean | Boolean | required |
| LocalDate | LocalDate | - | required |
| - | - | Date | required |
| ZonedDateTime | ZonedDateTime | - | required |
| - | - | UUID | required |
| Blob | Blob | - | required, minbytes, maxbytes |
| AnyBlob | AnyBlob | - | required, minbytes, maxbytes |
| ImageBlob | ImageBlob | - | required, minbytes, maxbytes |
| TextBlob | TextBlob | - | required, minbytes, maxbytes |