Using JHipster in development
Please check our video tutorial on creating a new JHipster application!IDE configuration
If you haven't configured your IDE yet, please go to the Configuring your IDE page.
Application configuration
By default, JHipster uses the "development" profile, so you don't have to configure anything.
If you want more information on the available profiles, please go the section titled "Profiles".
Running the application
As a "main" Java class
From your IDE, right-click on the "Application" class at the root of your Java package hierarchy, and run it directly. You should also be able to debug it as easily.
The application will be available on http://localhost:8080.
As a Maven project
You can launch the Java server with Maven:
mvn
(this will run our default Maven task, spring-boot:run)
The application will be available on http://localhost:8080.
If you want more information on using Maven, please go to http://maven.apache.org
(Optional) As a Gradle project
If you selected the Gradle option when creating the project but haven't installed Gradle, you can still launch the Java server with our Gradle wrapper script located at the root of your project:
gradlew
(this will run our default Gradle task, bootRun)
Alternatively, if you have installed Gradle, you can launch the Java server with Gradle:
gradle
The application will be available on http://localhost:8080.
If you want more information on using Gradle, please go to https://gradle.org
Using Gulp
Using the Java server and Gulp together
We highly recommend you use this feature, as it allows to have live reloading of your client-side code.
You can use Gulp to work on the client-side JavaScript application:
gulp
(this will run our default Gulp task, serve)
This should open up your Web browser, with live reload enabled, on http://localhost:9000. This works thanks to BrowserSync, and you can access its administration screen on http://localhost:3001.
This provides below very impressive features:
- As soon as you modify one of your HTML/CSS/JavaScript file, your browser will refresh itself automatically
- As soon as you add/remove a javascript file it will be added to the
index.html, your browser will refresh itself automatically - When you test your application on several different browsers or devices, all your clicks/scrolls/inputs should be automatically synchronized on all screens
This Gulp task has a proxy to the REST endpoints on the Java server which we just launched (on http://localhost:8080/api), so it should be able to do live REST requests to the Java back-end.
If you have generated your application with the Sass option, your templates should also be automatically compiled into CSS.
Tips'n tricks- In some browsers (like Chrome), your HTML/CSS/JS resources can be cached, and hence can have some trouble getting live-reloaded. To force them to be reloaded, open up the "developer console" and select "Disable cache (while DevTools is open)".
- As the Gulp server proxies request to the Java server, all REST requests will fail if the Java server is down. So if your Gulp server shows a blank screen, the first thing to check is if the Java server is running at
http://127.0.0.1:8080.
Other Gulp tasks
We use eslint for AngularJS javascript linting, you can run gulp eslint to lint your AngularJS files. You can also run gulp eslint:fix if you want eslint to fix some minor issues like formatting etc,.
You can run gulp install to run all bootstrapping tasks in one go
You can run gulp build to build an optimized version of your client side files under the target|build/www folder
By default you will get onscreen notifications for any errors or failures during gulp tasks, pass an argument --no-notification to disable notifications.
If you want more information on using Gulp, please go to http://gulpjs.com.
Using Bower to install and update JavaScript, CSS and Sass dependencies
You can use bower to update your JavaScript, CSS and Sass dependencies:
bower update
Or if you want to install a new JavaScript, CSS or Sass dependency:
bower install <package> --save
Your JavaScript, CSS or Sass dependencies will be stored in your src/main/webapp/bower_components folder, and we believe it is a good idea to store them in your Git repository (but JHipster does not force you to do so).
If the installed dependency contains JavaScript files they will automatically be injected into your index.html and karma.conf.js files. Likewise the CSS files will be injected into the index.html file, and the SCSS files into the main.scss.
However this will only work if the Gulp server is running. If it is not running they will be injected next time you run gulp.
Or, if you want to trigger the injection manually, just run:
gulp inject:dep
If you want more information on using Bower, please go to http://bower.io. For more information on using Gulp Inject, please go to https://github.com/klei/gulp-inject.
Using a database
Running a database
If you use a non-embedded database, like MySQL, MariaDB, PostgreSQL, MongoDB or Cassandra, you will need to install and configure that database.
The easiest and recommended way with JHipster is to use Docker Compose. Follow our Docker Compose guide here.
If you prefer to install and configure your database manually, don't forget to configure your Spring Boot properties accordingly in your src/main/resources/config/application-*.yml files (for example your database URL, login and password).
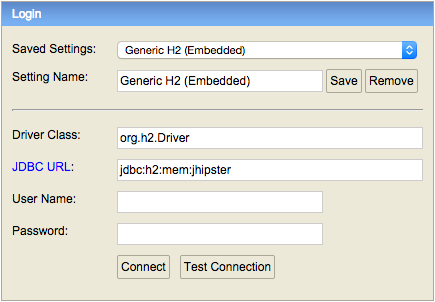
Using the H2 database in development
If you choose the H2 database, you will have an in-memory database running inside your application, and you can access its console at http://localhost:8080/h2-console by default.
To connect to the database, select the pre-configured options:
- Driver Class: org.h2.Driver
- JDBC URL: jdbc:h2:mem:jhipster
- User name: <blank>
- Password: <blank>
Using MySQL, MariaDB or PostgreSQL in development
This option is bit more complex than using H2, but you have a some important benefits:
- Your data is kept across application restarts
- Your application starts a little bit faster
- You can use the great
mvn liquibase:diffgoal (see below)
Database updates
If you add or modify a JPA entity, you will need to update your database schema.
JHipster uses Liquibase to manage the database updates, and stores its configuration in the /src/main/resources/config/liquibase/ directory. There are 3 ways to work with Liquibase: use the entity sub-generator, use the liquibase:diff Maven goal, or update the configuration files manually.
Database updates with the entity sub-generator
If you use the entity sub-generator, here is the development workflow:
- Run the entity sub-generator
- A new "change log" is created in your
src/main/resources/config/liquibase/changelogdirectory, and has been automatically added to yoursrc/main/resources/config/liquibase/master.xmlfile - Review this change log, it will be applied the next time you run your application
Database updates with the Maven liquibase:diff goal
If you have choosen to use MySQL, MariaDB or PostgreSQL in development, you can use the mvn liquibase:diff goal to automatically generate a changelog.
If you are running H2 with disk-based persistence, this workflow is not yet working perfectly, but you can start trying to use it (and send us feedback!).
Liquibase Hibernate is a Maven plugin that is configured in your pom.xml, and is independant from your Spring application.yml file, so if you have changed the default settings (for example, changed the database password), you need to modify both files.
Here is the development workflow:
- Modify your JPA entity (add a field, a relationship, etc.)
- Compile your application (this works on the compiled Java code, so don't forget to compile!)
- Run
mvn liquibase:diff(ormvn compile liquibase:diffto compile before) - A new "change log" is created in your
src/main/resources/config/liquibase/changelogdirectory - Review this change log and add it to your
src/main/resources/config/liquibase/master.xmlfile, so it is applied the next time you run your application
If you use Gradle instead of Maven, you can use the same workflow by running ./gradlew liquibaseDiffChangelog, and change the database configuration in liquibase.gradle if required.
Database updates by manually editing the change log
If you prefer (or need) to do a database update manually, here is the development workflow:
- Modify your JPA entity (add a field, a relationship, etc.)
- Create a new "change log" in your
src/main/resources/config/liquibase/changelogdirectory. The files in that directory are prefixed by their creation date (in yyyyMMddHHmmss format), and then have a title describing what they do. For example,20141006152300_added_price_to_product.xmlis a good name. - Add this "change log" file in your
src/main/resources/config/liquibase/master.xmlfile, so it is applied the next time you run your application
If you want more information on using Liquibase, please go to http://www.liquibase.org.
Internationalization
Internationalization (or i18n) is a first-class citizen in JHipster, as we believe it should be set up at the beginning of your project (and not as an afterthought).
Usage is really easy thanks to Angular Translate, which provides a simple AngularJS directive for i18n.
For example, to add a translation to the "first name" field, just add a "translate" attribute with a key:
<label translate="settings.form.firstname">First Name</label>
This key references a JSON document, which will return the translated String. AngularJS will then replace the "First Name" String with the translated version.
If you want more information on using languages, read our Installing new languages documentation.